User Management
Finances are often managed by different people at a business, all with various levels of responsibility. When an business leader needs to give account access to their employees, there are a wealth of entitlements and settings available to manage their permissions. With Banno Business’s User management, business admins can add new business users, edit details, and assign roles in Banno Online. They can also manage the overall permissions of business users, allow access to specific accounts, and control an business user’s permissions on an account-by-account basis.
Activity
Actions and activity taken by business users or on behalf of business users are captured and displayed for business users and institution admins. The types of activity that displays will depend upon which feed is being viewed. The business user Activity feed (only available in Banno People) will show every event and action taken by the user or on behalf of the user, the same as the Activity feed for retail users. The business Activity feed, which is an aggregation of all activity in the business across all users, is not as granular. Instead, this feed shows only key business actions taken by business users. Such actions include but are not limited to the following:
- Money movement
- Modifying entitlements and permissions
- Updating business and business user profile settings
Some business actions, however, are not yet visible from the business Activity feed. There is an ongoing effort to incorporate these actions into the feed, but the following events are known to not display:
- Bill payments
- Payees added
- Payees deleted
- Transfers
As new activity events occur, a new activity banner displays the number of new events at the top of the feed. Clicking the banner immediately updates the activity feed to display the new events.
At the top of the activity feed, a business user can filter events by time frame, a business user’s name, and the type of event. They can also download activity history in to a .csv file.
Viewing Activity in Banno Online
- User profile menu
- Business management
- Activity
Only business users with the role of Admin or Viewer can review the Activity feed.
Viewing Activity in Banno Admin
There are three levels of activity available in Banno Admin: Institution, Business, and Business User
Institution Level
- Banno Activity
Business-related changes and updates by institution admins create activity events in Banno Activity.
Business Level
- Banno People
- Users
- Business profile
- Activity
Business User Level
- Banno People
- Users
- Click business user
- Activity
Banks: User Management
Finances are often managed by different people at a business, all with various levels of responsibility. When a business leader needs to give account access to their employees, there are a wealth of entitlements and settings available to manage their permissions. With Banno Business’s User management, business admins can add new business users, edit details, and assign roles in Banno Online. They can also manage the overall permissions of business users, allow access to specific accounts, and control a business user’s permissions on an account-by-account basis.
- User profile menu
- Settings
- User management
In User management, business admins also manage entitlements and feature entitlements for members directly in the app, including:
- ACH
- ARP/Positive Pay
- Card management
- Stop payments
- Transfers
- Wires
With Banno Business, the company name displays alongside the business user’s name at the top of the Banno Apps dashboard and the user menu profile.
Enable and Disable Entitlement
In Banno People, your institution manages the User management entitlement for both the business and business users. You should ensure the entitlement is enabled for the business, as well as for business users who need access to Banno People.
Business
Banno People
- Users
- business profile
- Permissions
Your institution enables and disables User management in the business’s profile. For business users that need access to the entitlement, you’ll need to enable it for the individual.
Business User
Banno Online
- Settings
- User management
- User profile
- Set permissions
- User management
A business admin can enable and disable User management in the business user’s profile. This permission should always remain disabled for business users with a User role. If User management is enabled by mistake for a business user with a User role, our security measures will still prevent them from accessing user management functionality. They can see and click User management in their Settings, but the screen remains blank.
Banno People
- Users
- business user profile
- Permissions
- Business user permissions
Your institution can enable and disables User management in the business user’s profile. This permission should always remain disabled for business users with a User role. If User management is enabled by mistake for a business user with a User role, our security measures will still prevent them from accessing user management functionality. They can see and click User management in their Settings, but the screen remains blank.
Businesses
Create
Creating a new business in Banno People is not currently available.
Business Users
Profile
Banno Online
A list of all business users—including their name, role, and status—display on the User management dashboard. When a specific business user is selected, their profile information displays on a new screen and includes the following details:
- Avatar
- A profile image uploaded by the business user.
- Name
- The business user’s name is a maximum of 40 characters and editable by an business admin.
- Username
- The username is the name that a member of a business uses to login to the app.
- Role
- Roles only apply to what an business user can do within User management. The business user has an assigned role of Admin, Viewer, or User. A business user’s role can be changed by an business admin.
- Admin
- The Admin role gives an business user access to view or modify entitlements, set permissions for all business users, and manage business users (create, delete, etc.). They can also edit an business user’s profile details. Business admins cannot change their own roles; however, they can update a fellow admin’s role. User management must be enabled for each business admin.
- Viewer
- The Viewer role gives an business user access to view information in User management. They have the same access as an an business admin, but they can’t edit entitlements or set permissions. This role is ideal for auditors your institution works with. User management must be enabled for each business viewer.
- User
- The User role is for business members whose jobs involve performing day-to-day banking activities that don’t require user management rights. They can move money based on their entitlements and permissions, but they don’t have access to use or view the User management screen .
- Status
- A business user’s status can be Active, Pending, Disabled, or Locked. Excluding the Pending status, authorized institution personnel can manage an business user’s status in NetTeller BackOffice.
- Active
- The business user successfully joins the business by completing the app login process.
- Pending
- The business user has yet to successfully complete the app login process and join the business. A business admin submitted the business user’s details—first and last name, email, and role—when they created the new business user. The business user may or may not have accounts enabled. They may or not have already been invited to complete the app login process, but they must create their login credentials and log in to the app in order to change from a Pending status to an Active one—logging in to the app is required to change their status.
- Disabled
- The business user can’t log in to the app, and their account can’t be re-enabled.
- Locked
- The business user incorrectly entered their login credentials three or more times, and the account needs to be unlocked before the business user can successfully login.
- The business user’s email is a maximum of 80 characters and editable by an business admin.
- Business details
- The business’s business name, address, phone number, and email. This information matches the details listed in the business’s profile.
Profile Settings
Banno Online
- User management
- click business user
- settings
- Edit user
In the business user’s settings, an business admin can update or manage the following:
- Edit the business user’s details including name, user role, and email.
- Hold the business user’s account access.
- Send a link for the business user to reset their password.
- Delete the business user.
Editing a Nusiness User’s Profile
Within Banno Business, a business user can edit some of their own profile details. The following options are available:
- Username
- Edits the username used to log into the account.
- Changes the email associated with the business user’s account. This affects the email used for notifications and two-factor authentication methods.
- Phone number
- Updates the phone number associated with the business user’s account. This number can be selected for two-factor authentication.
A history event generates for changes to any of the above profile details.
Banno People
- Users
- click business user
- settings
In the business user’s settings, an admin user can view support cases related to the business user.
Role Comparison
A business user’s role can be updated in their profile settings. The following table helps familiarize business users with the available roles in user management:
| Admin | Viewer | User | |
|---|---|---|---|
| Move funds (create wire, upload ACH, etc.) | Y | Y | Y |
| View users | Y | Y | |
| Create users | Y | ||
| Delete users | Y | ||
| Unlock users | Y | ||
| Reset password | Y | ||
| Hold account | Y | ||
| View user profiles | Y | Y | |
| Edit user profiles | Y | ||
| View user permissions | Y | Y | |
| Edit user permissions | Y | ||
| View user account permissions | Y | Y | |
| Edit user account permissions | Y |
Create
Depending on an business user’s role, a newly created member of the business might need access to User management. If so, an institution employee needs to enable the User management entitlement for the member of the business.
Banno Online
- User management
- Manage users
- + Create user
A business admin creates a new business user by selecting + Create user in the Manage users window. Then, the business admin provides the following details in the Create user screen:
- First name
- The new business user’s first name.
- Last name
- The new business user’s last name.
- The new business user’s email. A Banno-generated email with a magic link sends to this email address so that the new business user can create their account credentials and log in to the Banno app.
- User role
- The user role determines what an business user can do within User management.
After providing the new business user’s details, the business admin selects Create user and completes a high risk authorization by entering their Banno app password. If there are three incorrect attempts, the business user is logged out of the app and their account locks. Their account will need to be unlocked.
Following a successful high risk authorization, the Enable accounts window displays. At this point, the new business user is yet to be informed of a created profile, has no credentials, and can’t to log in to the app. In the Enable accounts window, the new business user’s avatar, name, role, Pending status, and option to Enabled accounts display. By default, no accounts are automatically enabled, and the business admin needs to manually enable at least one account for the new business user.
To enable one or more accounts, the business admin clicks Select and the Account access window displays the business’s accounts to select from. The business admin can search accounts by account name and quickly enable or disable permissions to all accounts. After enabling one or more account and selecting Done, the business admin automatically navigates back to the Enable accounts window where it’s updated to display the number of enabled accounts (ex. 4 accounts, 12 accounts, All accounts, etc.). Although the account access displays as enabled, know that the accounts still won’t display as enabled in the new business user’s profile.
With the business admin still on the Enable accounts screen, they click the Enable Accounts button. A success message appears, and the business admin selects from one of the three following buttons:
- Send email invite
- If the business user’s account or user permissions don’t need updating, the business admin should send an email inviting the new business user to enroll in the Banno Digital Platform. After clicking the button, the business admin automatically returns to the Manage users screen where the new business user displays in a Pending state.
- Edit permissions
- If the business user’s account or user permissions need to be updated before they’re invited to enroll in the Banno Digital Platform, the business admin should click Edit permissions. This automatically navigates the business admin to the new business user’s profile where permissions can be updated and then invited. The new business user displays in a Pending state.
- Done
- Clicking Done returns the business admin to the Manage users screen where the new business user displays in a Pending state. An email invite doesn’t send to the new business user.
Once the success message appears, the selected accounts display as enabled in the new business user’s profile.
Banno People
- People
- Users
- Business profile
- Users
- Create business user
After creating the business and first business user on the core, banks can create a business user in Banno People. Before an institution admin can create a business user, they need both the Create everything permission and Edit everything permission enabled in the People section under Organizations and organization members.
An institution admin creates a new business user by selecting Create user in the business’s Users window. Then, the institution admin provides the following details in the Create user screen:
- First name
- The new business user’s first name.
- Last name
- The new business user’s last name.
- The new business user’s email. A Banno-generated email with a magic link sends to this email address so that the new business user can create their account credentials and log in to the Banno app.
- User role
- The user role determines what a business user can do within User management.
After the business user’s details are entered, the institution admin clicks Create user and the Enable accounts window displays. At this point, the new business user is yet to be informed of a created profile, has no credentials, and can’t to log in to the app. In the Enable accounts window, the new business user’s avatar, name, role, Pending status, and option to Enabled accounts display. By default, no accounts are automatically enabled, and the institution admin needs to manually enable at least one account for the new business user.
To enable one or more accounts, the institution admin clicks Select and the Account access window displays the business’s accounts to select from. The institution admin can search accounts by account name and quickly enable or disable permissions to all accounts. After enabling one or more account and selecting Done, the institution admin automatically navigates back to the Enable accounts window where it’s updated to display the number of enabled accounts (ex. 4 accounts, 12 accounts, All accounts, etc.). Although the account access displays as enabled, know that the accounts still won’t display as enabled in the new business user’s profile.
With the institution admin still on the Enable accounts screen, they click the Enable Accounts button. A success message displays and the institution admin selects from one of the three following buttons:
- Send email invite
- If the business user’s account or user permissions don’t need updating, the institution admin should send an email inviting the new business user to enroll in the Banno Digital Platform. If the email invitation successfully sends after clicking Send email invite, a success toast displays on the Users window after the success message automatically closes.
- Go to profile
- If the business user’s account or user permissions need to be updated before they’re invited to enroll in the Banno Digital Platform, the institution admin should click Go to profile. This automatically navigates the institution admin to the new business user’s profile where permissions can be updated and then invited. The new business user displays in a Pending state.
- I’m done
- Clicking I’m done returns the institution admin to the Users screen where the new business user displays in a Pending state. An email invite doesn’t send to the new business user.
Default Permissions
Default permissions are automatically assigned to new business users and can be updated on an individual basis with User management in the Banno app. Default permissions themselves can be managed by an institution on the host, and an institution can refer to NetTeller documentation for more information.
Invite
A business or institution admin needs to invite newly created business users and business users with a Pending status to create their credentials so that they can log in to the Banno app. The invitation is an automated email generated by Banno and includes a link that takes the business user to a screen where they create their Banno username and password. Any time a new invitation is sent to the user, the links in any previous invitations become expired.
Banno Online
The business admin can send the invite in one of two ways:
- When they successfully create a new business user, select Send an email invite.
- The business admin emails an invite from the business user’s profile by selecting Invite at the top of the profile.
In the new business user’s profile, a notification banner displays at the top of the screen: [Business user’s first and last name] account is pending. Invite them to complete set-up of their account. A business admin can only invite the new business user if one or more account is enabled. If no account is enabled, the error message Unable to invite user displays when clicking Invite. To enable one or more accounts for the new business user, an account’s Access permission needs to be selected. After enabling one one or more account, the business admin can refresh the page to ensure the screen updates. Then, they can successfully select Invite to send an email notifying the new business user to enroll in the Banno Digital Platform.
The name of the business admin who sent the invite and the option to click Join display in the email. After clicking the link, the business user automatically navigates to the app enrollment window and creates their username and password. After successfully creating their credentials, they view a Successfully created account message and click the Sign in button to navigate to the Banno Online login screen. If the business user unsuccessfully creates their username and password, they view an error message and should retry creating their credentials.
Banno People
New business users can be invited from Banno People by institution employees with the Edit everything permission. The institution admin can send the invite in one of two ways:
- When they successfully create a new business user, select Send an email invite.
- The institution admin emails an invite from the business user’s profile by selecting Invite at the top of the business user’s profile.
In the business user’s profile, a notification banner displays at the top of the screen: [Business user’s first and last name] account is pending. Invite them to complete set-up of their account. The institution admin clicks Invite to send an invitation to the business user.
The name of the institution admin who sent the invite and the option to click Join display in the email. After clicking the link, the business user automatically navigates to the app enrollment window and creates their username and password. After successfully creating their credentials, they view a Successfully created account message and click the Sign in button to navigate to the Banno Online login screen. If the business user unsuccessfully creates their username and password, they view an error message and should retry creating their credentials.
NetTeller
A business admin can invite an business user from NetTeller. The invitation from NetTeller contains a link to a NetTeller webpage–rather than Banno webpage–where the business user creates their NetTeller & Banno credentials (the same as they do today). Once they create their credentials and log in, they can use the existing SSO to navigate to Banno. To log in to Banno, they’ll use the same credentials they used to log into NetTeller.
NetTeller BackOffice
While a financial institution can invite a business user from NetTeller Back Office, the invitation utilizes NetTeller enrollment and will bring the user into NetTeller rather than the Banno platform. For institutions without the Cash Management SSO enabled, this invitation will not work for the end user. As such, we recommend all invitations be sent directly from Banno People.
Unlock
Banno Online
- User management
- click business user
- Unlock
When an business user incorrectly enters their login credentials three or more times, their profile status is Locked. A business admin needs to unlock the account before the business user can successfully log in. At the top of the business’s user profile, a notification banner displays at the top of the screen: [Business user first and last name]’s account access is locked due to multiple incorrect login attempts.
A business admin successfully unlocks an business user’s account by selecting the Unlock button in the banner. This changes the business user’s status from Locked to Active, and the business admin can select I’m done or Send password reset link in the User successfully unlocked message that displays. If I’m done is clicked, the business user can immediately log in to the app. If Send password reset link is clicked, the business user follows emailed instructions so that they can reset their password and log in to the app.
Banno People
- Users
- click business user
- Unlock
When an business user’s account is locked, a notification banner displays at the top of each page in the business user’s profile in Users: [Business user first and last name]’s account access is locked due to multiple incorrect login attempts. An institution admin can successfully unlock the business user’s account by selecting the Unlock button in the banner. This changes the business user’s status from Locked to Active, and the institution admin can select I’m done or Send password reset link in the User successfully unlocked message that displays. If Send password reset link is clicked, the business user follows emailed instructions so that they can reset their password and log in to the app.
Hold
The held status for a business user isn’t visible to the individual, and it disables the business user from logging into the app. For example, the held state could apply to an business user on a short-term leave. If a business user needs their app login access temporarily disabled, an business admin can change it in the app, or an institution employee can change it in NetTeller.
Banno Online
- click business user
- settings
- Hold account status
- Hold
A business admin can hold an business user’s account, preventing the business user from logging in to the app. After it is successfully on hold, a notification banner displays across the top of the business user’s profile: [Business user first and last name]’s account access is temporarily on hold. The hold status doesn’t change the business user’s status (active, locked, etc.) in their profile.
To remove a hold on an account, an business admin selects the Remove button that displays in the notification banner at the top of the business user’s profile. Removing a hold is immediate, and the notification banner no longer displays. A success also toast displays when the hold is successfully removed from the business user.
Banno People
- Users
- click business user
- Overview and Security pages
When an business user’s account is on hold, institution admins can’t remove the hold status from an business user’s account. A notification banner displays at the top of the Overview and Security pages in the business user’s profile in Users: [Business user first and last name]’s account access is temporarily on hold. Only an admin at their business can remove the hold on their account.
Reset Password
A business admin or institution admin resets an business user’s password when they unlock the profile or use the profile’s settings. This prompts the app to send an email with the password reset link and instructions to the business user.
Banno Online
A business admin unlocks an business user’s profile by sending a password reset link in User management.
- click business user
- Unlock
- Send password reset link
After the business admin unlocks a profile, they can also reset the password by selecting the Send password reset link button instead of the I’m done button in the success message that displays.
- click business user
- settings
- Send password reset link
If the business user forgets their password or needs it reset, an business admin assists by selecting Send password reset link in the business user’s settings. The business admin then clicks Email that prompts the app to send the password reset link to the business user’s email. The business user must click the link provided in the email and follow the instructions to create a new password.
Banno People
An admin user can unlock an business user’s profile by sending a password reset link from Banno People.
- Users
- click business user
- Security
- Password reset
- Send link
If the business user forgets their password or needs it reset, an admin user assists by clicking Send link in the Password reset section of the business user’s Security page. The business admin then clicks Email, which prompts the app to send the password reset link to the business user’s email. Once the password reset link sends successfully, a success toast displays. The business user must click the link provided in the email and follow the instructions to create a new password.
Delete
Banno Online
- User management
- click business user
- Delete user
Within the member of the business’s profile, an business admin can delete the business user. Deleting an business user removes the profile from User management and Banno People. The business user is deleted from the core, as well as NetTeller BackOffice, and is unrecoverable.
Banno People
The functionality to delete an business user currently exists in Banno Online only.
History Events
Changes made in user management (updating a permission, modifying an business user profile, etc.) by an admin user or business admin create history events in Banno Admin. History events display in the business user’s Activity and can be sorted using the Permissions filter under User. History events for high risk authorization that are requested, failed, or passed by the business user are captured but do not yet display.
Banno Activity also records history events and can be sorted using the Permissions filter under People Users.
If changes occur on core or in NetTeller BackOffice, history events won’t display in Banno Admin.
Banks: Entitlements and Permissions
User management offers granular permissions so that business admins can tailor an individual’s access to money movement. Business admins control which entitlements their business users interact with as well as which accounts the users can or cannot access to move funds. Institution admins can also view and manage the same permissions in Banno Admin.
Granular Entitlements and Permissions
Because user management allows permissions to be customized down to an account-by-account basis, there are four permission levels. The different permission levels and where they’re managed include the following:
1. Institution level
Banno manages permissions so that your institution can offer the functionality to your customers.
2. Business level
- Banno Admin
- Your institution manages permissions in the business’s profile in Banno People.
3. Business user level
- Banno Admin
- In Banno People, institution employees manage permissions for entitlements that allow a business user to use its functionality. Currently, they can only view and not edit permissions for feature entitlements.
- Banno Online
- A business admin manages permissions in User management. They can enable and disable permissions to use an entitlement and feature entitlements.
- NetTeller BackOffice
- Your bank manages permissions in NetTeller BackOffice.
- NetTeller
- Business users manages permissions in NetTeller.
4. Business user account level
- Banno Admin
- Your institution views the permissions in Banno People but currently can’t manage them.
- Banno Online
- A business admin manages permissions in User management.
- NetTeller BackOffice
- Your bank manages permissions in NetTeller BackOffice.
- NetTeller
- Business users manages permissions in NetTeller.
For security purposes, permissions can override one another. A business user can only see an entitlement and use its functionality if that entitlement’s “parent” permission(s) are configured to allow it. For example, if an business user needs access to upload ARP/Positive Pay, an enterprise user first ensures that the ARP/Positive Pay entitlement is enabled in the business’s profile in Banno People. Then, the business admin should complete the following in Banno Online:
- In User management, navigate to the business user’s profile.
- They select Set permissions to view the business user permissions.
- In the ARP/Positive Pay section, ensure the Enabled permission’s toggled on.
- A financial institution employee can also validate the permission in the business user’s profile in Banno People.
- In the same section, ensure the Upload ARP/Positive Pay permission’s enabled.
- The business admin navigates back to the business user’s profile.
- They select the account that the business user needs to upload ARP/Positive Pay.
- In the Account access permission section, ensure the Enable permission’s toggled on.
- In the ARP/Positive Pay permission section, ensure the Upload ARP/Positive Pay permission’s enabled.
If any permissions in this flow aren’t enabled correctly, ARP/Positive Pay functionality in the account might not display or work properly.
If the business user has trouble with an entitlement or accessing functionality, the following steps ensure an entitlement is enabled and permissions are turned on at the correct levels:
- Users
- business profile
- Permissions
- In Banno People, the institution employee checks that the entitlement is enabled for the business.
- Users
- business user profile
- Permissions
- Business user permissions
- In Banno People, the institution employee checks that the entitlement is enabled for the member of the business.
- User management
- business user
- Set permissions
- In Banno Online, the business admin adjusts the appropriate permissions in the business user’s permissions.
- User management
- business user
- click account name
- If the business user needs access to view and use an account, in Banno Online the business admin must enable the Account access permission in the business user’s account permissions. Then, the business admin adjusts the permissions specific to an entitlement.
Business User Permissions
Banno Online
- User management
- click business user
- Set permissions
Business user permissions for entitlements display in the business user’s profile. Within the profile, an business admin can manage these permissions for how the business user views and interacts with entitlements. This includes the individual’s access to Wires, ACH, and more. These permissions apply to the overall functionality of an entitlement. Because some permissions interact with others, tooltips display alongside certain permissions in the app, helping guide the business admin to correctly enable functionality. If applicable, these dependencies are noted in a permission’s definition.
Depending on your institution configuration and an business’s entitlements, business user permissions may vary but can include:
- ACH
- ARP/Positive Pay
- Card management
- Stop payments
- Transfers
- Wires
Banno People
- Users
- business user profile
- Permissions
- Business user permissions
In Banno People, enterprise users can access the same business user permissions. When an enterprise user selects View all at the bottom of the Business user permissions section, permissions for entitlements and feature entitlements display. Enterprise users with the Edit everything permission can manage entitlement permissions as well as account access.
Business User Account Permissions
Banno Online
- User management
- click business user
- Account
- click account
The business admin can edit an business user’s access to an individual account and their account permissions, including stopping payments, transferring funds to and from an account, and more. Depending on your institution and an business’s configurations, business user permissions for an account may vary but can include:
- Account access
- ARP/Positive Pay
- Stop payments
- Transfers
- Wires
Banno People
- Users
- business user profile
- Accounts
- select account
In Banno People, enterprise users can view and edit the same business user account permissions. A business admin has the ability to do so with User management in Banno Online.
Permissions
Permissions that display in the business user’s profile and their account settings are nearly identical. Depending if the business user has permission at the business or account level, the permission functions similarly.
Account Access
The Enable permission displays only in the business user’s account permissions. It allows or blocks an business user’s access to the account. If the permission’s disabled, the account doesn’t display to the business user.
ACH
ACH permissions are business user permissions only; they are not business user account permissions (not supported on an account-by-account basis).
- Enabled
- Allows the business user access to ACH functionality. It must be enabled if an business user needs access to ACH. This permission is an business user permission only; it’s not an business user account permission.
- View ACH
- Allows the business to view ACH transactions/batches.
- Daily ACH limit
- The maximum amount an business user can initiate per day. This field can’t be set to zero if a permission that’s dependent on it is enabled.
- Initiate ACH
- Allows the business user to send ACH transactions/batches to the institution for processing.
- Full ACH control
- Allows the business user to take multiple actions within a batch without requiring action from a second user.
- Initiate same day ACH
- Allows the business user to initiate same day ACH batches.
- Edit/create ACH Control
- Describes the extent to which an business user can create and modify ACH batches.
- Full edit/create
- Allows the business user to create and modify ACH batches.
- Partial edit
- Allows the business user to edit a receiver’s amount, transaction type (debit or credit), addenda information, held status, and prenote status.
- None
- The business user has no ability to edit or create ACH batches.
- Recurring ACH
- Allows the business user to edit recurring ACH batches during batch edit.
- Import recipients
- Allows the business user to upload a fixed-position, CSV, or tab-delimited file into a batch that can only contain transaction items.
- Upload ACH file
- Allows the business user to upload ACH transactions.
- Batch delete
- Allows the business user to remove a single ACH batch or multiple ACH batches.
- Restricted batch access
- Allows the business user to create and view restricted batches/categories that are marked restricted at the time of entry or during edit.
ARP/Positive Pay
- Enabled
- This switch enables the ARP/Positive Pay entitlement so that the business user has access to its functionality. It must be enabled if an business user needs access to ARP/Positive Pay. This permission is an business user permission only; it’s not an business user account permission.
- Upload ARP/Positive pay
- Allows the business user to upload an ARP/positive pay file.
- Download ARP
- Allows the business user to download the output file created by your financial institution.
- Work ARP/Positive pay
- Allows the business user to work positive pay (check) exceptions.
- Work ACH Exceptions
- Allows the business user to decide to pay/return ACH exception items. This requires Account Activities Y and P.
Card Management
Card management permissions are business user permissions only; they are not business user account permissions (not supported on an account-by-account basis).
- Enabled
- Gives the member of the business access to Card management and its functionality. It must be enabled if an business user needs access to managing a card(s) associated with an account(s).
- Card management
- Allows an business user to use Card management functionality. When the permission’s disabled, the business user is unable to manage a card(s) associated with an account(s).
Stop Payments
- Enabled
- Gives the member of the business access to the Stop payments and its functionality. It must be enabled if an business user needs access to Stop payments. This permission is an business user permission only; it’s not an business user account permission.
- View stop payment
- Allows the business user to view the stop payment history.
- Add stop payment
- Allows the business user to create stop payments.
Transfers
- Enabled
- Gives the member of the business access to the Transfers and its functionality. It must be enabled if an business user needs access to Transfers. This permission is an business user permission only; it’s not an business user account permission.
- Transfer limit
- The maximum amount an business user can send to another account per transfer. This permission is an business user permission only; it’s not an business user account permission. This field can be set to zero.
- Allow transfers
- Allows the business user to initiate transferring funds between internal accounts. This permission is an business user permission only; it’s not an business user account permission.
- Transfer to
- Allows the business user to move funds to the account. This permission applies to internal transfers only. If the permission’s disabled, the account doesn’t display as an option when the business user creates a transfer. This permission is an an business user account permission only; it’s not an business user permission.
- Transfer from
- Allows the business user to move funds out of the account. This permission applies to internal transfers only. When the permission’s disabled, the account doesn’t display as an option when the business user creates a transfer. This permission is an an business user account permission only; it’s not an business user permission.
Wires
- Enabled
- Gives the member of the business access to the Wires and its functionality. It must be enabled if an business user needs access to Wires. This permission is an business user permission only; it’s not an business user account permission.
- Work with wires
- Allows the business user to transfer wires.
- Create wire templates
- Allows the business user to create repetitive—template—wires.
- Edit wire templates
- Allows the business user to modify repetitive—template—wires.
- Create one-time wires
- Allows the business user to create non-repetitive, one-time wires.
- Edit one-time wires
- Allows the business user to edit/modify non-repetitive, one-time wires.
- Edit recurring wires
- Allows the business user to edit recurring wires.
- Per wire limit
- The maximum amount in whole dollars—cannot be set with cents—an business user can initiate per wire. For example, 25000.00, 14999.00, 10500.00, etc. This field can be set to zero.
- Daily wire limit
- The maximum amount in whole dollars—cannot be set with cents—an business user can initiate per day. For example, 25000.00, 14999.00, 10500.00, etc. This field can be set to zero.
- Dual wire control limit
- Wires over this amount require a second business user for approval. The limit must be set in whole dollars—it cannot be set with cents. For example, 25000.00, 14999.00, 10500.00, etc. This field can be set to zero.
- Transmit wires
- Allows the business user to send wires. This includes sending any type of wire, including non-repetitive, repetitive, future-dated, and recurring wires.
- Transmit recurring wires
- Allows the business user to send repetitive, recurring wires (ex. weekly, monthly, etc.).
- Dual wire control
- Requires a second business user to approve wires that are over the dual wire control limit.
- Transmit future-dated wires
- Allows the business user to send wires (non-repetitive or repetitive) as future-dated. The effective date must be greater than the current day’s date.
Dual-Nranded Institutions
For institutions that have multiple brands, feature entitlements will sync across both brands. If Works with wires is enabled for a user on Brand A, then Works with wires will also be enabled for that user on Brand B. However, entitlement permissions do not sync across brands. If Wires is disabled for a user on Brand A, then Wires will need to also be manually disabled for that user on Brand B.
View-Only Permission Settings
Select permissions can be enabled so that an business user views the functionality in the Banno app and cannot use it for actions such as moving funds or updating permissions. This includes allowing an business user to view-only ACH, Stop payments, Transfers, and User management. The ability to view-only is unavailable for Card management, Positive pay, and Wires. If an business user needs to view one or both functionalities in the Banno app, they will also have the ability to use it.
At the business user level, adjust the following permissions in Banno People or Banno Online so that the business user can only view the functionality:
ACH
- Enable the Enabled permission.
- Enable the View ACH permission.
- Disable all other ACH permissions.
Stop Payments
- Enable the Enabled permission.
- Disable all other stop payments permissions.
Transfers
- Enable the Enabled permission.
- Set the transfer limit to zero.
- Disable all other transfers permissions.
User Management
- Ensure the business user has the role of Viewer.
- Enable the Enabled permission.
History Events
Changes made in user management (updating a permission, modifying an business user profile, etc.) by an admin user or business admin create history events in Banno Admin. History events display in the business user’s Activity and can be sorted using the Permissions filter under User. Banno Activity also records history events and can be sorted using the Permissions filter under People Users.
If changes occur on core or in NetTeller BackOffice, history events won’t display in Banno Admin.
Banks: Business Management
Admin users with the Admin role and the Manage everything permission can edit business details for a given business via Banno Online. After navigating to
- My profile
- Business Management
- Profile
- Edit the business’s email address. This must be a valid email address to proceed. Changes to this field are subject to the Update CIF Email setting value in NetTeller Back Office.
- Phone number
- Edit the business’s phone number. This must be a valid, domestic number. While editing the business phone number in NetTeller updates the number associated with the NetTeller ID, updating the number in the Banno app updates the phone number on the CIF. This can lead to different values if the value is only updated in one location.
Editing any of the information above generates a history event.
Banks: Manage External Applications and Additional Services
- Banno People
- Settings
- External applications
For an institution to manage the visibility of an external application for a business and its business users, the external application must have the User type field set to Business only or Both retail and business.
Once the external application is ready to display to business admins in Banno Online, enable the external application at the institution level in Banno People. This allows the external application to display in the Permissions section of all business profiles across the institution.
When the external application is enabled at the institution level, it is automatically enabled by default at the business level permissions. The external application is also visible, but disabled, to all business admins within User management across the institution. No business user will see the external application until either a business admin or a bank employee has manually enabled it for that user.
If an institution hasn’t enabled any external applications for businesses, the message Your [institution] hasn’t enabled any external applications for businesses. displays until there are enabled external applications.

According to an external application’s configuration, the Link title field displays as the external application title (1) and the Description (optional) field describes the external application (2) to business admins in Banno Online and admin users in Banno People.
Cleaning Up External Application Names
To help easily identify external applications with the same name, some institutions may have been using the Description field to call out the Link type of the application. As this field is now used to give business admin’s context about the external application, institutions may wish to remove this text.
In anticipation of this, we added some additional columns to the External applications list in People to ensure that our institutions can still easily identify external applications with the same name. Now the list of external applications will show the Name, Link title, Link type, and User type. Previously the list only displayed the Name with the Description shown as subtext.
Business Permissions
Banno People
- Users
- Click business
- Permissions
- External applications
Once the external application is enabled at the institution level, the external application is automatically enabled by default at the business level. The external application is also visible, but disabled, to all business admins. Having the external application enabled at the business level gives business admins across the institution the ability to then manage visibility of the external application to business users. No business user will see the external application until either a business admin or a bank employee has manually enabled it for that user.
Unlike other permissions, there is not an option for the institution to manage External applications permissions at the business user level without also giving business admins the ability to manage the same permissions.
If an external application is disabled at the business level, the external application:
- Displays as disabled in the business profile in People.
- Does not display to business admins in User management
- Displays as uneditable at the business user level in People. The external application cannot be updated unless it is first enabled at the business level.
Business User Permissions
Enabling an external application at the business user level gives them the ability to view the external application in Banno Online.
External application permissions only manage the business user’s ability to see the external application in Banno Online—it does not control access to or login to the external application. If a business user has the link to the external application, such as a bookmark, they can still access the external application while authenticated in Banno Online.
Even if an external application is disabled, the business user may still be able to access the external application directly and perform actions allowed by their application. Permissions for accessing an external application are managed in the external application—not in Banno Online or Banno People.
Banno Online
- User management
- Click business user
- Additional services
In User management, a business admin manages external applications on behalf of business users. They need to manually enable each external application at the individual business user level for any business user to view the external application in Banno Online.
Banno People
- Users
- Click business user
- Permissions
- External applications
In Banno People, admin users can manage external applications for a business user.
Permission States
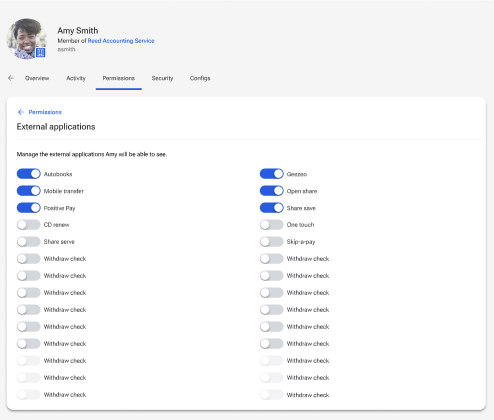
Depending on the level where an external application is or is not enabled, the external application permission may or may not be editable in the business users’s profile. If an editable permission displays, the external application is enabled at the business level (1 & 2). If an uneditable permission displays, the external application is disabled at the business level (3).
If an external application does not display in a business user’s permissions, ensure the external application is enabled at the business levels.
If an external application is disabled in the business profile, ensure the external application is configured with the User type set to either Both retail and business or Business only.
Testing New Applications
Sometimes, institutions want to test a new external application with a few business users before enabling it for all businesses. To achieve this, you’ll want to ensure to use the following configuration.
- Set the User type set to either Both retail and business or Business only.
- Disable the external application at the institution level so that it is not enabled by default for all businesses.
- Enable the external application for the business.
- Enable the external application for the business user.
Credit Unions: User Management
Finances are often managed by different people at a business, all with various levels of responsibility. When a business leader needs to give account access to their employees, there are a wealth of entitlements and settings available to manage their permissions. With Banno Business’s User management, business admins can add new business users, edit details, and assign roles in Banno Online. They can also manage the overall permissions of business users, allow access to specific accounts, and control a business user’s permissions on an account-by-account basis.
- User profile menu
- Business management
- User management
In User management, business admins also manage entitlements and feature entitlements for members directly in the app, including:
- ACH
- ARP/Positive Pay
- Card management
- Stop payments
- Transfers
- Wires
With Banno Business, the company name displays alongside the business user’s name at the top of the Banno Apps dashboard and the user menu profile.
Enable and Disable Entitlement
In Banno People, your institution manages the User management entitlement for both the business and business users. You should ensure the entitlement is enabled for the business, as well as for business users who need access to Banno People.
Business
Banno People
- Users
- Business profile
- Permissions
Your institution enables and disables User management in the business’s profile. For business users that need access to the entitlement, you’ll need to enable it for the individual.
Member of a Business
Banno Online
- Settings
- User management
- User profile
- Set permissions
- User management
A business admin can enable and disable User management in the member of a business’s profile. This permission should always remain disabled for business users in a User role. If User management is enabled by mistake for a business users with a User role, our security measures will still prevent them from accessing user management functionality. They can see and click User management in their Settings, but the screen remains blank.
Banno People
- Users
- Business user profile
- Permissions
- Business user permissions
Your institution can enable and disables User management in the member of a business’s profile. This permission should always remain disabled for business users in a User role. If User management is enabled by mistake for a business users with a User role, our security measures will still prevent them from accessing user management functionality. They can see and click User management in their Settings, but the screen remains blank.
Businesses
Create Business
- People
- Users
- Create business
Credit unions can create a business in Banno People. Before an institution admin can create a business, they need the Create everything permission enabled in the People section. The institution admin also needs the Symitar account number associated with the business.
After the institution admin clicks Create business, the Create business window prompts the institution to enter the 10 digit Symitar account number. If the Symitar account number is less than 10 digits, add zeros preceding the account number so that it is 10 digits (ex. 0000987654). Then, the institution admin confirms the account number and reviews the business’s details in the Create business screen that can include:
- Business name
- Symitar account number
- Preference record username (created and assigned by Banno)
- Mobile number
- Address
If the business information is correct, the institution admin clicks Create. After the business is created, the institution admin cannot reverse or undo creating the business.
If the business details are incorrect, the institution admin clicks in the Create business screen to edit the details. If the business has already been created, the institution admin is alerted and can click Go to profile to view the profile screen or to re-enter the Symitar account number.
When the business is successfully created, the institution admin automatically navigates to the business’s Overview profile screen that displays the business’s information. Institution admins can refer to Users and learn more about the Users and Permissions screens.
Business Users
Business Profile
Banno Online
A list of all business users—including their name, role, and status—display on the User management dashboard. When a specific business user is selected, their profile information displays on a new screen and includes the following details:
- Avatar
- A profile image uploaded by the business user.
- Name
- The business user’s name is a maximum of 40 characters and editable by a business admin.
- Username
- The username is the name that a member of a business uses to login to the app.
- Role
- Roles only apply to what a business user can do within User management. The member of a business has an assigned role of Admin, Viewer, or User. A business user’s role can be changed by a business admin.
- Admin
- The Admin role gives a business user access to view or modify entitlements, set permissions for all business users, and manage business users (create, delete, etc.). They can also edit a business user’s profile details. Business admins cannot change their own roles; however, they can update a fellow admin’s role. User management must be enabled for each business admin.
- Viewer
- The Viewer role gives a business user access to view information in User management. They have the same access as a business admin, but they can’t edit entitlements or set permissions. This role is ideal for auditors your institution works with. User management must be enabled for each business viewer.
- User
- The User role is for business members whose jobs involve performing day-to-day banking activities that don’t require user management rights. They can move money based on their entitlements and permissions, but they don’t have access to use or view the User management screen.
- Status
- A business user’s status can be Pending or Active. The status changes from Pending to Active when they have been sent an invitation and completed enrollment.
- Pending
- The business user has yet to successfully complete the enrollment process and join the business. A business admin submitted the business user’s details—first and last name, email, and role—when they created the new business user. The business user may or may not have accounts enabled. To change from a Pending status to Active, they must create their login credentials and log in to the app.
- Active
- The business user successfully joined the business by completing enrollment.
- The business user’s email is a maximum of 80 characters and editable by a business admin.
- Business details
- The business name, address, phone number, and email. This information matches the details listed in the business profile.
Profile Settings
Banno Online
- User management
- Click business user
- Settings
- Edit user
In the business user’s settings, a business admin can update or manage the following:
- Edit the business user’s details including name, user role, and email.
- Hold the business user’s account access.
- Send a link for the business user to reset their password.
- Delete the business user.
Banno People
- Users
- Business user profile
- settings
In the business user’s settings, an admin user can view support cases related to the business user.
Role Comparison
A business user’s role can be updated in their profile settings. The following table helps familiarize business users with the available roles in user management:
| Admin | Viewer | User | |
|---|---|---|---|
| Move funds (create wire, upload ACH, etc.) | Y | Y | Y |
| View users | Y | Y | |
| Create users | Y | ||
| Delete users | Y | ||
| View user profiles | Y | Y | |
| Edit user profiles | Y | ||
| View user permissions | Y | Y | |
| Edit user permissions | Y | ||
| View user account permissions | Y | Y | |
| Edit user account permissions | Y |
Create User
Depending on a business user’s role, a newly created member of the business might need access to User management. If so, an institution employee needs to enable the User management entitlement for the member of the business.
Banno Online
- User management
- Manage users
- + Create user
A business admin creates a new business user by selecting + Create user in the Manage users window. Then, the business admin provides the following details in the Create user screen:
- First name
- The new business user’s first name.
- Last name
- The new business user’s last name.
- The new business user’s email. A Banno-generated email with a magic link sends to this email address so that the new business user can create their account credentials and log in to the Banno app.
- User role
- The user role determines what a business user can do within User management.
After providing the new business user’s details, the business admin selects Create user and the Enable accounts window displays. At this point, the new business user is yet to be informed of a created profile, has no credentials, and can’t to log in to the app. In the Enable accounts window, the new business user’s avatar, name, role, Pending status, and option to Enabled accounts display. By default, no accounts are automatically enabled, and the business admin needs to manually enable at least one account for the new business user.
To enable one or more accounts, the business admin clicks Select and the Account access window displays the business’s accounts to select from. The business admin can search accounts by account name and quickly enable or disable permissions to all accounts. After enabling one or more account and selecting Done, the business admin automatically navigates back to the Enable accounts window where it’s updated to display the number of enabled accounts (ex. 4 accounts, 12 accounts, All accounts, etc.). Although the account access displays as enabled, know that the accounts still won’t display as enabled in the new business user’s profile.
With the business admin still on the Enable accounts screen, they click the Enable Accounts button. A success message appears, and the business admin selects from one of the three following buttons:
- Send email invite
- If the business user’s account or user permissions don’t need updating, the business admin should send an email inviting the new business user to enroll in the Banno Digital Platform. After clicking the button, the business admin automatically returns to the Manage users screen where the new business user displays in a Pending state.
- Edit permissions
- If the business user’s account or user permissions need to be updated before they’re invited to enroll in the Banno Digital Platform, the business admin should click Edit permissions. This automatically navigates the business admin to the new business user’s profile where permissions can be updated and then invited. The new business user displays in a Pending state.
- Done
- Clicking Done returns the business admin to the Manage users screen where the new business user displays in a Pending state. An email invite doesn’t send to the new business user.
Once the success message appears, the selected accounts display as enabled in the new business user’s profile.
Banno People
- People
- Users
- Business profile
- Users
- Create business user
Credit unions can create a business user in Banno People. Before an institution admin can create a business user, they need the Create everything permission enabled in the People section.
An institution admin creates a new business user by selecting Create user in the business’s Users window. Then, the institution admin provides the following details in the Create user screen:
- First name
- The new business user’s first name.
- Last name
- The new business user’s last name.
- The new business user’s email. A Banno-generated email with a magic link sends to this email address so that the new business user can create their account credentials and log in to the Banno app.
- User role
- The user role determines what a business user can do within User management.
After the business user’s details are entered, the institution admin clicks Create user and completes a high risk authorization by entering their Banno app password. There is no limit to the number of times they can enter their credentials, but they must successfully complete the high risk authorization to create a new business user.
Following a successful high risk authorization, a success message displays and the institution admin selects from one of the three following buttons:
- Send email invite
- If the business user’s account or user permissions don’t need updating, the institution admin should send an email inviting the new business user to enroll in the Banno Digital Platform. If the email invitation successfully sends after clicking Send email invite, a success toast displays on the Users window after the success message automatically closes.
- Go to profile
- If the business user’s account or user permissions need to be updated before they’re invited to enroll in the Banno Digital Platform], the institution admin should click Go to profile. This automatically navigates the institution admin to the new business user’s profile where permissions can be updated and then invited. The new business user displays in a Pending state.
- I’m done
- Clicking I’m done returns the institution admin to the Users screen where the new business user displays in a Pending state. An email invite doesn’t send to the new business user.
While a business user is still created and can log in after completing enrollment, no accounts can be enabled for the business user. Functionality is coming soon to enable accounts for a business user in Banno People.
Default Permissions
Permissions for new business users are disabled and need to be updated on an individual basis by a business admin in User management or an admin user in Banno People.
Invite
An institution admin needs to invite newly created business users and business users with a Pending status to create their credentials so that they can log in to the Banno app. The invitation is an automated email generated by Banno and includes a link that takes the business user to a screen where they create their Banno username and password.
Banno Online
The business admin can send the invite in one of two ways:
- When they successfully create a new business user, select Send an email invite.
- The business admin emails an invite from the business user’s profile by selecting Invite at the top of the profile.
In the new business user’s profile, a notification banner displays at the top of the screen: [Business user’s first and last name] account is pending. Invite them to complete set-up of their account. A business admin can only invite the new business user if one or more account is enabled. If no account is enabled, the error message Unable to invite user displays when clicking Invite. To enable one or more accounts for the new business user, an account’s Access permission needs to be selected. After enabling one one or more account, the business admin can refresh the page to ensure the screen updates. Then, they can successfully select Invite to send an email notifying the new business user to enroll in the Banno Digital Platform.
The name of the business admin who sent the invite and the option to click Join display in the email. After clicking the link, the business user automatically navigates to the app enrollment window and creates their username and password. After successfully creating their credentials, they view a Successfully created account message and click the Sign in button to navigate to the Banno Online login screen. If the business user unsuccessfully creates their username and password, they view an error message and should retry creating their credentials.
Banno People
New business users can be invited from Banno People. The institution admin can send the invite in one of two ways:
- When they successfully create a new business user, select Send an email invite.
- The institution admin emails an invite from the business user’s profile by selecting Invite at the top of the business user’s profile.
In the business user’s profile, a notification banner displays at the top of the screen: [Business user’s first and last name] account is pending. Invite them to complete set-up of their account. The institution admin clicks Invite to send an invitation to the business user.
The name of the institution admin who sent the invite and the option to click Join display in the email. After clicking the link, the business user automatically navigates to the app enrollment window and creates their username and password. After successfully creating their credentials, they view a Successfully created account message and click the Sign in button to navigate to the Banno Online login screen. If the business user unsuccessfully creates their username and password, they view an error message and should retry creating their credentials.
Edit Role
Banno Online
- User management
- Click business user
- Settings
- Edit user
In a business user’s settings, a business admin can edit a business user’s role. A business admin will soon be able to update a business user’s name and email—Banno is currently working on this functionality.
Banno People
Hold
The held state for a member of a business isn’t visible to the individual, and it disables the business user from logging into the app. For example, the held state could apply to a business user on a short-term leave. If a member of a business needs their app login access temporarily disabled, a business admin can change it in the app, or an institution employee can change it in Banno People.
Banno Online
- Click business user
- Settings
- Hold account status
- Hold
A business admin can hold a business user’s account, preventing the business user from logging in to the app. After it’s successfully on hold, a notification banner displays across the top of the business user’s profile. The hold status doesn’t change the business user’s status (Pending or Active) in their profile.
To remove a hold on an account, a business admin selects the Remove button that displays in the notification banner at the top of the business user’s profile. Removing a hold is immediate, and the notification banner no longer displays. A success also toast displays when the hold is successfully removed from the business user.
Banno People
- Users
- Click business user
- Settings
- Hold account status
An admin user can enable or disable a hold on a business user’s account access. When a business user’s account is on hold, institution admins can remove the held state from a business user’s account. A banner notifies the admin user that the business user is in a held state, and it displays at the top of the Overview and Security pages in the business user’s profile in Users.
Reset Password
A business admin or institution admin resets a business user’s password when they unlock the profile or use the profile’s settings. This prompts the app to send an email with the password reset link and instructions to the business user.
Banno Online
A business admin unlocks a business user’s profile by sending a password reset link in User management.
- User management
- Click business user
- Unlock
- Send password reset link
After the business admin unlocks a profile, they can also reset the password by selecting the Send password reset link button instead of the I’m done button in the success message that displays.
- Click business user
- Settings
- Send password reset link
If the business user forgets their password or needs it reset, a business admin assists by selecting Send password reset link in the business user’s settings. The business admin then clicks Email that prompts the app to send the password reset link to the business user’s email. The business user must click the link provided in the email and follow the instructions to create a new password.
Banno People
An admin user can unlock a business user’s profile by sending a password reset link from Banno People.
- Users
- Business user profile
- Security
- Password reset
- Send link
If the business user forgets their password or needs it reset, an admin user assists by clicking Send link in the Password reset section of the business user’s Security page. The business admin then clicks Email, which prompts the app to send the password reset link to the business user’s email. Once the password reset link sends successfully, a success toast displays. The business user must click the link provided in the email and follow the instructions to create a new password.
Delete User
When a business user is deleted, they cannot be recovered. If the business user needs to be part of the business again, they must be invited and complete the enrollment process.
Banno Online
- User management
- Click business user
- Settings
- Delete user
A business admin deletes a business user by selecting Delete user in the business user profile.
Banno People
- Users
- Business user profile
- Settings
- Delete user
An admin user deletes a business user by selecting Delete user in the business user’s profile settings.
Credit Unions: Business Profile
- User profile menu
- Business management
- Profile
The business profile with company details, such as the name, address, and email, display in the Business management Profile.
Creating Your First Admin User
When creating your first administator, you may require that admin to verify their identity before enrolling.
This makes the enrollment process just a bit different for the first admin who tries to enroll. Before completing enrollment, the admin must verify using a phone number stored in the core for that user. These include:
- Home phone
- Work phone (only available without extension)
- Mobile phone
A temporary phone number can also be added via People.
Upon selecting a number, the admin user must enter a code sent to the number selected. After this is complete, the enrollment will continue as normal.
When no valid numbers are displayed
As the numbers presented are based on the primary name record, there is a chance that there may be no valid phone numbers listed. This can be resolved in one of two ways:
- Update the primary name record
- Update the primary name record in your core. These changes will be reflected the first time a magic link is clicked. As such, the admin user will need to be sent a new invitation.
- Enter a temporary phone number
- A temporary phone number may be added for a user via People. This phone number is discarded after it is used for a single enrollment. This option can be found in
.
- Users
- Business user profile
- Invitation banner
- Set temporary phone number
Entitlements and permissions
User management offers granular permissions so that business admins can tailor an individual’s access to money movement. Business admins control which entitlements their business users interact with as well as which accounts the users can or cannot access to move funds. Admin users can also view—and in some occasions manage—the same permissions in Banno Admin.
Granular entitlements and permissions
For security purposes, permissions can override one another. A business user can only see an entitlement and use its functionality if that entitlement’s “parent” permission(s) are configured to allow it. These troubleshooting steps help explain how permissions are enabled from the business level down to the business user account level.
Because user management allows permissions to be customized down to an account-by-account basis, there are five permission levels. The different permission levels and where they’re managed include the following:
1. Institution level
Banno manages permissions so that your institution can offer the functionality to your customers.
2. Business level
- Banno Admin
- Your institution views and manages entitlements in the business’s profile in Banno People.
3. Business account level
- Banno Admin
- Your institution views and manages permissions for accounts in the business’s profile in Banno People.
4. Business user level
- Banno Admin
- In Banno People, institution employees manage permissions for entitlements that allow a member of a business to use its functionality.
- Banno Online
- A business admin manages permissions in User management. They can enable and disable permissions to use an entitlement and feature entitlements.
5. Business user account level
- Banno Admin
- Your institution views and manages permissions in Banno People.
- Banno Online
- A business admin manages permissions in User management.
Manage business permissions
- Users
- Click business
- Overview
- Business permissions
- View all
- Users
- Click business
- Permissions
- Business permissions
- View all
In Banno People, permissions for business entitlements and accounts display in the business’s profile. Within the profile, a business admin can manage these permissions for how a business views and interacts with entitlements. Depending on your institution configuration and a business’s entitlements, a business’s permissions may vary but can include:
- ACH
- Transfers
- Wires
- User management
Manage business account permissions
- Users
- Click business
- Permissions
- Accounts
- View all
In Banno People, permissions for business accounts display in the business’s Permissions screen. An admin user can manage these permissions for how a business views and interacts with accounts. Depending on your institution configuration and a business’s entitlements, a business’s account permissions may vary but can include:
- ACH
- Transfers
- Wires
Business and account permissions
The following sections include an overview of the business entitlements and permissions that an admin user manages in Banno People:
- ACH
- Transfers
- User management
- Wires
Within each section, permissions are separated by permissions at the business level and the business account level. Because some permissions interact with others, tooltips in Banno Admin display alongside certain permissions in, helping guide admin users to correctly enable functionality. If applicable, those dependencies are noted in the permission’s definition.
ACH
Business permissions
- Enable
- Allows the business access to ACH entitlements. It must be enabled if a business user needs to use ACH functionality.
- View ACH
- Allows the business to grant business users access to view ACH transactions/batches.
- Initiate ACH
- Allows the business to grant business users access to send ACH transactions/batches to the institution for processing.
- Daily ACH limit
- The maximum amount a business can initiate per day. The field must be set higher than zero.
- Per batch ACH limit
- The maximum amount that a business can initiate per batch.
- Edit/create ACH Control
- Describes the extent to which a business allows business users to create and modify ACH batches.
- Full edit/create
- Allows the business to grant business users to create and modify ACH batches.
- Partial edit
- Allows the business to grant business users to edit a receiver’s amount, transaction type (debit or credit), addenda information, held status, and prenote status.
- None
- Allows the business to block business users from the ability to edit or create ACH batches.
- Upload ACH file
- Allows the business to grant business users access to upload ACH transactions.
- Batch delete
- Allows the business to grant business users access to remove a single ACH batch or multiple ACH batches.
- ACH debits
- Allows the business to grant business users access for creating and initiating outgoing ACH debit transactions.
- ACH credits
- Allows the business to grant business users access for creating and initiating outgoing ACH credit transactions.
- SEC code CCD
- Allows the business to grant business users access to ACH batches with the Standard Entry Class Code CCD.
- SEC code CTX
- Allows the business to grant business users access to ACH batches with the Standard Entry Class Code CTX.
- SEC code PPD
- Allows the business to grant business users access to ACH batches with the Standard Entry Class Code PPD.
- SEC code TEL
- Allows the business to grant business users access to ACH batches with the Standard Entry Class Code TEL.
- SEC code WEB
- Allows the business to grant business users access to ACH batches with the Standard Entry Class Code WEB.
Business account permissions
- Offset account
- Allows the business to grant business users access to create and initiate outgoing ACH batches with the account. The
SHARE:MICRACCTNUMBERfield in core must be populated with a valid MICR value for it to be included in the NACHA file—the batch’s offset transaction uses the MICR value as the account number.
Transfers
Business permissions
- Enable
- Allows the business access to Transfers entitlements. It must be enabled if a business user needs to use Transfers functionality.
- Transfer limit
- The maximum amount a business can send to another account per transfer. The field must be set higher than zero.
Business account permissions
- Transfer to
- Allows the business to grant business users access to move funds to the account. This permission applies to internal transfers only. If the permission’s disabled, the account doesn’t display as an option when the business user creates a transfer.
- Transfer from
- Allows the business to grant business users access to move funds out of the account. This permission applies to internal transfers only. When the permission’s disabled, the account doesn’t display as an option when the business user creates a transfer.
User management
User Management permissions are business permissions only; they are not business account permissions (not supported on an account-by-account basis).
- Enable
- Allows the business access to User management entitlements. It must be enabled if an business user needs to use User management functionality.
Wires
Business permission
- Enable
- Allows the business access to Wires entitlements. It must be enabled if a business user needs to use Wires functionality.
- View wires
- Allows the business to grant business users access to view wires associated with the account. Additional permissions must be enabled in order to view the wires for any account. The ability for a user to be a View Only user is not supported for wires.
- Delete wires
- Allows an business to grant business users access to delete wires.
- Create one-time wires
- Allows the business to grant business users access to create non-repetitive, one-time wires.
- Edit one-time wires
- Allows the business to grant business users access to edit/modify non-repetitive, one-time wires.
- Transmit wires
- Allows the business to grant business users access to send wires. This includes sending any type of wire, including non-repetitive, repetitive, future-dated, and recurring wires.
- Per wire limit
- The maximum amount an business can initiate per wire. For example,
25000.50,14999.99,10500.00, etc. The field must be set higher than zero.
Business account permissions
- View wires
- Allows the business to grant business users access to view wires associated with the account.
- Delete wires
- Allows an business to grant business users access to delete wires associated with the account.
- Create one-time wires
- Allows the business to grant business users access to create non-repetitive, one-time wires associated with the account.
- Edit one-time wires
- Allows the business to grant business users access to edit/modify non-repetitive, one-time wire associated with the account.
- Transmit wires
- Allows the business to grant business users access to send wires associated with the account. This includes sending any type of wire, including non-repetitive, repetitive, future-dated, and recurring wires.
- Per wire limit
- The maximum amount an business can initiate per wire associated with the account. For example,
25000.50,14999.99,10500.00, etc. The field must be set higher than zero.
Enable account
The Enable permission displays in a business’s account permissions. It shows what is set on the core and can be managed in Banno People. Access to accounts for the business must be handled by modifying account access on the core. If account access is disabled, the account doesn’t display to business users.
If multiple businesses have access to an account, modifying account access only impacts the business where the change was made.
Manage business user permissions
A business admin can manage business user permissions in Banno Online, and an admin user can manage the same permissions in Banno People. Depending on your institution configuration and an business’s entitlements, business user permissions may vary but can include:
- ACH
- Card management
- Stop payments
- Transfers
- User Management
- Wires
Banno Online
- User management
- Click business user
- Set permissions
In Banno Online, business user permissions for entitlements display in the business user’s profile. Within the profile, a business admin can manage these permissions for how the business user views and interacts with entitlements.
Banno People
- Users
- Business user profile
- Permissions
- Business user permissions
In Banno People, admin users can manage business user permissions. When an admin user selects View all at the bottom of the Business user permissions section, permissions for entitlements and feature entitlements display.
Manage business user account permissions
A business admin can manage business user permissions in Banno Online, and an admin user can manage the same permissions in Banno People. Depending on your institution configuration and a business’s entitlements, business user permissions may vary but can include:
- Account access
- ACH
- Transfers
- Wires
Banno Online
- User management
- Click business user
- Account
- Click account
The business admin can edit a business user’s access to an individual account and their account permissions.
Banno People
- Users
- Business user profile
- Permissions
- Accounts
- select account
In Banno People, admin users can manage business user account permissions. When an admin user selects an account, permissions for entitlements and feature entitlements display.
Business users and account permissions
The following sections include an overview of the business user entitlements and account permissions that an business admin or admin user can manage:
- Enable account
- ACH
- Card management
- Stop payments
- Transfers
- User management
- Wires
Within each section, permissions are separated by permissions at the business user level and the business user account level. Because some permissions interact with others, tooltips in Banno Admin display alongside certain permissions in, helping guide admin users to correctly enable functionality. If applicable, those dependencies are noted in the permission’s definition.
Account access
The Enable permission displays only in the business user’s account permissions. It allows or blocks an business user’s access to the account. If the permission’s disabled, the account doesn’t display to the business user.
ACH
Business user permissions
- Enable
- Allows the business user access to ACH entitlements. It must be enabled if a business user needs to use ACH functionality.
- View ACH
- Allows the business user to view ACH transactions/batches.
- Initiate ACH
- Allows the business user to send ACH transactions/batches to the institution for processing.
- Daily ACH limit
- The maximum amount a business user can initiate per day. The field must be set higher than zero.
- Per batch ACH limit
- The maximum amount that a business user can initiate per batch.
- Edit/create ACH Control
- Describes the extent to which a business user can create and modify ACH batches.
- Full edit/create
- Allows the business user to create and modify ACH batches.
- Partial edit
- Allows the business user to edit a receiver’s amount, transaction type (debit or credit), addenda information, held status, and prenote status.
- None
- The business user has no ability to edit or create ACH batches.
- Upload ACH file
- Allows the business user to upload ACH transactions.
- Batch delete
- Allows the business user to remove a single ACH batch or multiple ACH batches.
- ACH debits
- Allows the business user to create and initiate outgoing ACH debit transactions.
- ACH credits
- Allows the business user to create and initiate outgoing ACH credit transactions.
- SEC code CCD
- Allows the business user to access ACH batches with the Standard Entry Class Code CCD.
- SEC code CTX
- Allows the business user to access ACH batches with the Standard Entry Class Code CTX.
- SEC code PPD
- Allows the business user to access ACH batches with the Standard Entry Class Code PPD.
- SEC code TEL
- Allows the business user to access ACH batches with the Standard Entry Class Code TEL.
- SEC code WEB
- Allows the business user to access ACH batches with the Standard Entry Class Code WEB.
Business user account permissions
- Offset account
- Grants an business user the ability to use the account as the offset for the total amount of transactions in a batch. The
SHARE:MICRACCTNUMBERfield in the Symitar core must be populated with a valid MICR value for it to be included in the NACHA file—the batch’s offset transaction uses the MICR value as the account number. This permission can only be set if it has already been set at the business level.
Card management
Card management permissions are business user permissions only; they are not business user account permissions (not supported on an account-by-account basis).
- Enable
- Allows the business user access to Card management entitlements. It must be enabled if an business user needs to managing a card(s) associated with an account(s).
Stop payments
Stop payments permissions are business user permissions only; they are not business user account permissions (not supported on an account-by-account basis).
- Enable
- Allows the business user access to Stop payments entitlements. It must be enabled if a business user needs to use Stop payments functionality.
Transfers
Business user permissions
- Enable
- Allows the business user access to Transfers entitlements. It must be enabled if a business user needs to use Transfers functionality.
- Transfer limit
- The maximum amount a business user can send to another account per transfer. The field must be set higher than zero.
Business user account permissions
- Transfer to
- Allows the business user to move funds to the account. This permission applies to internal transfers only. If the permission’s disabled, the account doesn’t display as option when the business user creates a transfer. This permission is a business user account permission only; it’s not a business user permission.
- Transfer from
- Allows the business user to move funds out of the account. This permission applies to internal transfers only. When the permission’s disabled, the account doesn’t display as option when the business user creates a transfer. This permission is a business user account permission only; it’s not a business user permission.
User Management
User Management permissions are business user permissions only; they are not business user account permissions (not supported on an account-by-account basis).
- Enable
- Allows the business user access to User Management entitlements. It must be enabled if an business user needs to use User Management functionality.
Wires
Business user permission
- Enable
- Allows the business user access to Wires entitlements. It must be enabled if an business user needs to use Wires functionality.
- View wires
- Allows the business user to view wires. Additional permissions must be enabled in order to view the wires for any account. The ability for a user to be a View Only user is not supported for wires.
- Delete wires
- Allows an business user to delete wires.
- Create one-time wires
- Allows the business user to create non-repetitive, one-time wires.
- Edit one-time wires
- Allows the business user to edit/modify non-repetitive, one-time wires.
- Transmit wires
- Allows the business user to send wires. This includes sending any type of wire, including non-repetitive, repetitive, future-dated, and recurring wires.
- Per wire limit
- The maximum amount an business can initiate per wire. For example,
25000.50,14999.99,10500.00, etc. This field can be set to zero.
Business user account permissions
- View wires
- Allows the business user to view wires associated with the account. Additional permissions must be enabled in order to view the wires for any account. The ability for a user to be a View Only user is not supported for wires.
- Delete wires
- Allows an business user to delete wires associated with the account.
- Create one-time wires
- Allows the business user to create non-repetitive, one-time wires associated with the account.
- Edit one-time wires
- Allows the business user to edit/modify non-repetitive, one-time wires associated with the account.
- Transmit wires
- Allows the business user to send wires associated with the account. This includes sending any type of wire, including non-repetitive, repetitive, future-dated, and recurring wires.
- Per wire limit
- The maximum amount an business can initiate per wire associated with the account. For example,
25000.50,14999.99,10500.00, etc. This field can be set to zero.
Manage external applications & additional services
- Banno People
- Settings
- External applications
For a credit union to manage the visibility of an external application to a business and its business users, the external application must have the User type field set to Business only or Both retail and business.
Once the external application is ready to display to business admins in Banno Online, enable the external application at the institution level in Banno People. This allows the external application to display in the Permissions section of all business profiles across the institution.
When the external application is enabled at the institution level, it is automatically enabled by default at the business level permissions. The external application is also visible, but disabled, to all business admins across the institution.
If an institution hasn’t enabled any external applications for businesses, the message Your [institution] hasn’t enabled any external applications for businesses. displays until there are enabled external applications.
According to an external application’s configuration, the Link title field displays as the external application title (1) and the Description (optional) field describes the external application (2) to business admins in Banno Online and admin users in Banno People.
Business permissions
Banno People
- Users
- Click business
- Permissions
- External applications
Once the external application is enabled at the institution level, the external application is automatically enabled by default at the business level. The external application is also visible, but disabled, to all business admins. Having the external application enabled at the business level gives business admins across the institution the ability to then manage visibility of the external application to business users.
Unlike other permissions, there is not an option for the institution to manage External applications permissions at the business user level without also giving business admins the ability to manage the same permissions.
If an external application is disabled at the business level, the external application:
- Displays as disabled in the business profile in People.
- Does not display to business admins in User management
- Displays as uneditable at the business user level in People. The external application cannot be updated unless it is first enabled at the business level.
Business user permissions
Enabling an external application at the business user level gives them the ability to view the external application in Banno Online.
External application permissions only manage the business user’s ability to see the external application in Banno Online—it does not control access to or login to the external application. If a business user has the link to the external application, such as a bookmark, they can still access the external application while authenticated in Banno Online.
Even if an external application is disabled, the business user may still be able to access the external application directly and perform actions allowed by their application. Permissions for accessing an external application are managed in the external application—not in Banno Online or Banno People..
Banno Online
- User management
- Click business user
- Additional services
In User management, a business admin manages external applications on behalf of business users. They need to manually enable each external application at the individual business user level for any business user to view the external application in Banno Online.
Banno People
- Users
- Click business user
- Permissions
- External applications
In Banno People, admin users can manage external applications for a business user.
Permission states
Depending on the level where an external application is or is not enabled, the external application permission may or may not be editable in the business users’s profile. If an editable permission displays, the external application is enabled at the business and institution levels (1 & 2). If an uneditable permission displays, the external application is disabled at the business level and enabled at the institution level (3).
If an external application does not display in a business user’s permissions, ensure the external application is enabled at the business and institution levels.
View-only permission settings
Select permissions can be enabled so that an business user views the functionality in the Banno app and cannot use it for actions such as moving funds or updating permissions. This includes allowing an business user to view-only ACH, stop payments, transfers, user management, and wires. View-only is unavailable for card payments. If an business user needs to view the card payments functionality in the Banno app, they will also have the ability to use it.
At the business user level, adjust the following permissions in Banno People or Banno Online so that the business user can only view the functionality:
ACH
- Enable the Enabled permission.
- Enable the View ACH permission.
- Disable all other ACH permissions.
Stop payments
- Enable the Enabled permission.
- Disable all other stop payments permissions.
Transfers
- Enable the Enabled permission.
- Set the transfer limit to zero.
- Disable all other transfers permissions.
User management
- Ensure the business user has the role of Viewer.
- Enable the Enabled permission.
Wires View only is not supported for Wires.
Troubleshoot
For security purposes, permissions can override one another. A business user can only see an entitlement and use its functionality if that entitlement’s “parent” permission(s) are configured to allow it. For example, if an business user needs access to delete wires, an admin user first ensures the following permissions are enabled in the business’s profile in Banno People:
- Wires at the business level
- View wires at the business level
- Delete wires at the business level
- Account access at the business account level
- View wires at the business account level
- Delete wires at the business account level
- The admin user or an business admin continues updating permissions at the different levels.
Permission steps for admin users in Banno People
If the admin user continues managing the permissions, they complete the following steps:
- Wires at the business user level
- View wires at the business user level
- Delete wires at the business user level
- Account access at the business user account level
- View wires at the business user account level
- Delete wires at the business user account level
Permission steps for business admins in Banno Online
If the business admin manages permissions (and not the admin user in Banno People), they complete the following steps:
- In User management, navigate to the business user’s profile.
- They select Set permissions to view the business user permissions.
- In the Wires section, ensure the Enable permission is toggled on.
- In the same section, ensure the Delete wire permission is enabled.
- The business admin navigates back to the business user’s profile.
- They select the account that the business user needs to delete wires.
- In the Account access section, ensure the Enable permission is toggled on.
- In the Wires section, ensure the Delete wires permission is enabled.
If any permissions in this flow aren’t enabled correctly, Wires functionality might not display or work properly for the business or business user.
If the business user has trouble with an entitlement or accessing functionality, an admin user can follow these steps to ensure that permissions in Banno People are turned on at the correct levels:
- Users
- business profile
- Permissions
- Business permissions
- At the business level, check that the entitlement is enabled for the business.
- Ensure that other relevant permissions are enabled.
- Users
- business profile
- Permissions
- Accounts
- At the business account level, check that account access is enabled for the business’s account.
- Ensure that other relevant permissions are enabled.
- Users
- business user profile
- Permissions
- Business user permissions
- At the business user level, check that the entitlement is enabled for the member of the business.
- Ensure that other relevant permissions are enabled.
- Users
- business user profile
- Permissions
- Accounts
- At the business user account level, check that account access is enabled for the business user.
- Ensure that other relevant permissions are enabled.
History events
Changes made in user management (updating a permission, modifying an business user profile, etc.) by an admin user or business admin create history events in Banno Admin. History events display in the business user’s Activity and can be sorted using the Permissions filter under User. History events also display in Banno Activity and can be sorted using the Permissions filter under People Users.
Pulling a list of business users
There are several ways to pull a list of all business users at your financial institution.
Query the host directly
Option 1: Query through Cognos via the Home banking cash user file.
Option 2: Query the HBCLUS file directly. Going this route gives the most control over which users you pull.
Download the user mapping
This can be accessed by going to Banno Admin > Reports > Exports and requesting a copy of the User mapping report.
This report can be pared down to Business users by filtering column E to only blanks, deleting all resulting entries, then unfiltering column E.
Note: This only pulls business users who have logged into Banno.
Download the Manage User List from NetTeller Back Office
Navigate to Manage Users > Manage User List, then select Cash Mgmt from the User type drop down and download to Excel. Then open the file, removing rows 1-3, and enter =LEFT(B2,12) into an empty column. Copy this formula to every row, then copy that column to a new spreadsheet and save the spreadsheet as a CSV. This produces a CSV file including all Busienss users.
Note: This will give you the all NetTeller IDs, but not the cash management user IDs.
Request a copy of the Get Current Alias Report from Jack Henry
This report can simply be requested from Jack Henry. The data can be further cleaned up by deleting all columns except CmUserAlias. Blank users represent users that were created through Banno and are still pending, meaning they have not enrolled yet.
Note: This report may contain inactive and duplicate users.
FAQ: User management
Read frequently asked questions about user management for Banno Business.
FAQ: Activity
- If a business user is deleted, are their activity events deleted from the business activity feed?
- No, activity events for a deleted business user still display in the business activity feed.
FAQ: User management for banks
- What are the differences in each user role? Can we create a partial admin?
- Business admins can do everything, including edit, as well as delete and create once available. Viewers can see all details about a user, like an auditor, and viewers can also access user management. The user role is a standard user within the business and cannot access user management. This role comparison table can help familiarize business users with the available roles in user management.
There is not currently a partial admin role.
- Why can an business user with a viewer role move funds?
- The viewer role only applies to what the user can do in user management. It doesn’t apply to the permissions that the user can be granted for other parts of the application, but they can be permission’ed so that they only have view-only access.
FAQ: Entitlements and permissions for banks
- A business Admin has trouble getting an entitlement to display or a permission working properly for one of their business users. How can I help them?
- Enabling entitlements and getting permissions working properly can be tricky, especially for a new business admin. Checkout out the Entitlements and permissions section for steps on how to assist the business admin.
- What’s the difference between an entitlement and a feature entitlement?
- An entitlement is the overall functionality that an business user moves funds with, such ACH, Wires, Transfers, etc. A feature entitlement is the specific functionality of an entitlement, such as Initiate ACH, Edit one-time wires, View stop payment, etc.
FAQ: User management for CUs
- What are the differences in each user role? Can we create a partial admin?
- Business admins can do everything, including edit, as well as delete and create once available. Viewers can see all details about a user, like an auditor, and viewers can also access user management. The user role is a standard user within the business and cannot access user management. This role comparison table can help familiarize business users with the available roles in user management.
There is not currently a partial admin role.
FAQ: Entitlements and permissions for CUs
- A business Admin has trouble getting an entitlement to display or a permission working properly for one of their business users. How can I help them?
- Enabling entitlements and getting permissions working properly can be tricky, especially for a new business admin. Checkout out the Entitlements and permissions section for steps on how to assist the business admin.
- What’s the difference between an entitlement and a feature entitlement?
- An entitlement is the overall functionality that an business user moves funds with, such ACH, Wires, Transfers, etc. A feature entitlement is the specific functionality of an entitlement, such as Initiate ACH, Edit one-time wires, View stop payment, etc.