Enrolling in payments with iPay
When your end users want to pay a bill, they want to do it now. Lengthy enrollment processes, long approval times, or having to log into a different website to get set up isn’t an acceptable option for most end users. Luckily, whether they’re on Banno Mobile or Banno Online, enrolling in iPay payments is quick and simple, getting your end users in and out as quickly as possible.
Requirements
Payment enrollment with iPay is available for institutions with the following features enabled:
- Bill pay
- iPay enrollment
In addition, the iPay SSO feature must be enabled and your end users must enroll using it in Banno Online if your institution has either of the following features enabled:
- Bill pay terms and conditions
- Challenge phrases
If either of these features are enabled, when a mobile end user navigates to the Payments screen with no enrolled accounts they’ll be instructed to enroll using a desktop or laptop computer.
If you have questions about the status of these configurations for your institution, please contact your support representative.
How to enroll
- Payments
- Enroll
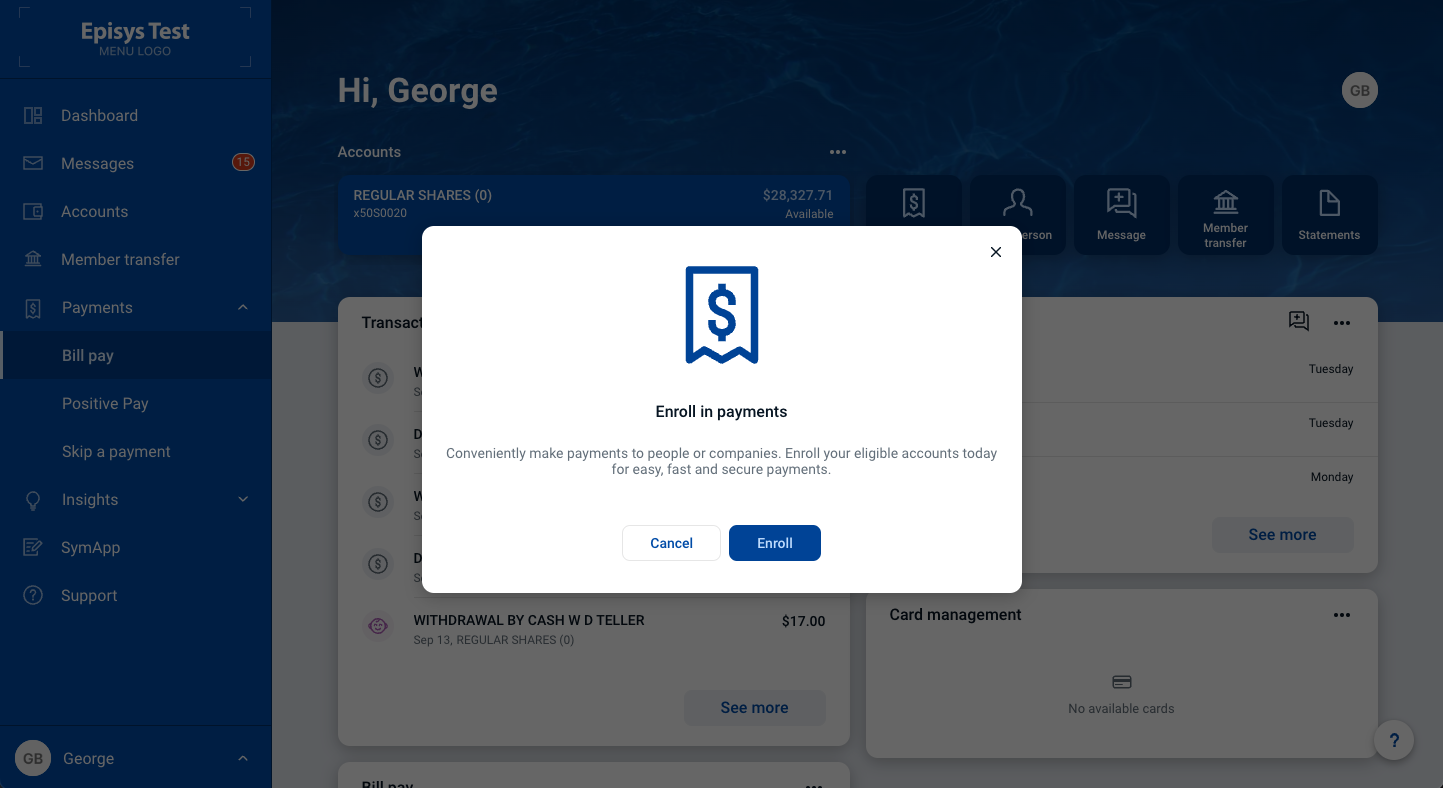
Enrolling is simple. When an end user navigates to the Payments page with no enrolled bill pay accounts, they are presented with a screen prompting them to click the Enroll button. After the request processes, the end user sees a success screen and a prompt to Add a payee.
If the end user declines to add a payee from this screen, they will be prompted again the next time they navigate to the Payments screen.
Tips
The following tips help ensure an end user successfully enrolls in iPay:
- The end user’s physical address should be accurate according to the USPS database. Also, the address must be a physical address and not a PO box.
- If an end user writes a check and it has to be returned, the end user needs a physical address to receive the check.
- Retail users can enroll directly through Banno, but Cash Management users enroll through the Cash Management SSO.
- Retail and individual profiles must be enrolled as a consumer iPay subscriber, and Cash Management users must be enrolled as a Business Bill Pay iPay subscriber.
- In NetTeller BackOffice, Cash Management users must have the Bill Pay entitlement enabled in the following settings :
- CM User Default Settings > Edit Account Access > check Bill Pay
- CM User Account Settings > Edit Access Rights > check Bill Pay
When enrollment fails
Sometimes an end user is unable to complete the enrollment process. If this occurs, they see one of the following messages.
No eligible accounts
If the end user has no eligible bill pay accounts, they receive a message informing them that we couldn’t find any eligible accounts and they’re presented the following options:
- Start a conversation
- Call us
We’re sorry
If we’re unable to determine why enrollment failed, the end user sees a generic “We’re sorry” message. They’re presented with the following options:
- Start a conversation
- Call us
How do end users access iPay?
Retail
Retail end users can launch the iPay SSO a couple different ways in Banno Online.
- Payments
- Manage payments
- Dashboard
- Payments card
- Manage payments
Configuring Bill Pay for Organizations

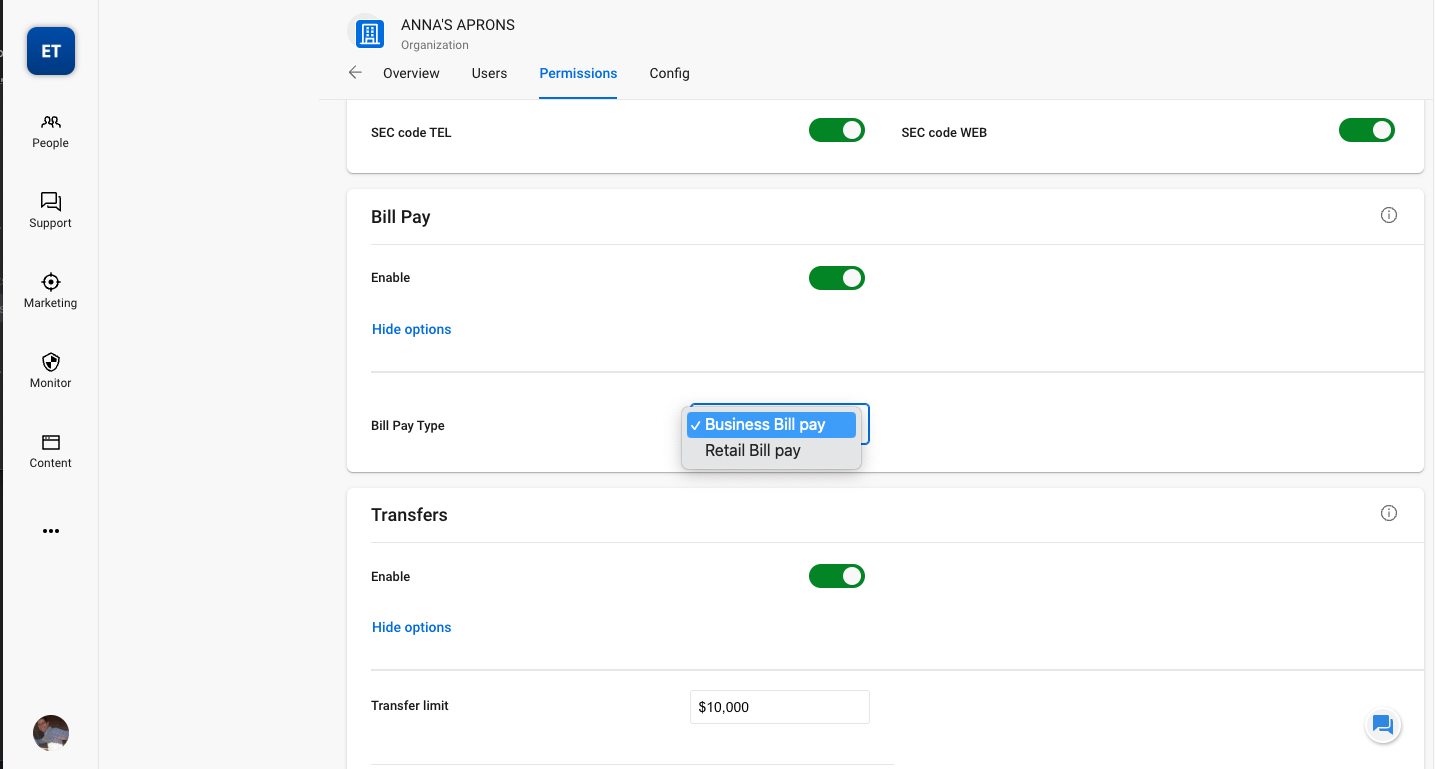
Step 1) Turn on Bill Pay for an organization
- Select the enable toggle within Organization permissions
- Select Business or Retail
Step 2) Enable and enroll the Admin of the organization with the Bill Pay ability
- The admin needs to enroll prior to any other user
- Enable the User permission “Bill Pay”
- Have the user enroll in Bill Pay by selecting “Bill Pay” from the main navigation.
Step 3) Enable and have the business admin enroll the rest of the organization.
- Within Business User Management, select a user to enroll
- Select “Set Permissions”
- Select the Bill Pay toggle
- Have the user login and enroll the same way as the admin by selecting “Bill Pay” from the main navigation
When enrolling in Business Bill Pay with Banno, the initial user (the iPay “super user,” indicated by ** in iPay) should be the same CM user who completes the enrollment process. After enrollment, the Organization will no longer appear in iPay.

Cash Management
Cash Management (CM) end users can access iPay only through Banno Online. Depending on your institution’s configuration, here’s how CM end users can launch the iPay SSO and use iPay functionalities.
- Launching iPay SSO in Banno Online
- Unlike retail end users, CM end users won’t view or access the Manage payments option that launches iPay SSO in Banno Online. Instead, they’ll need to launch the iPay SSO through NetTeller.
- Business
- Cash manager
- Using iPay as part of native integrations
- Bill Pay is a native integration within Banno Apps, meaning it can be used directly in our app without SSO configuration. If Bill Pay is enabled for the CM end user and they’re enrolled in it, iPay functionalities such as Pay a bill and Pay a payee will be usable within either App.
- Launching the Cash Management SSO
- For CM end users to access the iPay SSO through the CM SSO, Bill Pay will need to be enabled at the end user level in NetTeller BackOffice:
- Account Settings
- Edit Access Rights
- select the Bill Pay checkbox
If your institution doesn’t have Cash Management SSO and uses two logins (Banno for retail and NetTeller for Cash Management), Cash Management end users access Bill Pay via SSO in NetTeller.
FAQ
- Will iPay SSO be available on Banno Mobile?
- At this time, no. We’re focused on moving away from using an iPay SSO altogether and having the functionality within Banno Apps itself. This’ll provide a faster, smoother experience for end users! As a result, we’re currently directing our efforts to maintaining and building the feature solely within Banno Online.