Users & Groups
You probably have a lot of roles for your team, and not everyone needs access to everything. Users & Groups gives you the tools to manage permissions for users and groups, ensuring that your team has access to what they need, when they need it.
How it works
Users & groups aim to make it simple. Choose a user, add them to a group, and they’ll get access to everything that group has access to. Any apps that user has no permissions for will be hidden from them when they log into banno.com, keeping their working interface clean and easy to manage. Of course, with so many settings, you’ll have some questions. Luckily, we have answers. Check ’em out below.
Users
Within Users & Groups, the Users screen is your home base for your individual team members. From here, you can view all of your enterprise users, filter by group, and search by name. Clicking any name will bring you to the settings screen for that user.
Inviting new users
The Invite people button allows you to add new team members. All you need to do is enter their email address, and invite them to at least one existing Banno group – and any optional JH Platform groups if applicable – and they’ll receive an email inviting them to set up an account. The Send invite button will only be selectable once you have both an email address entered and at least one Banno group selected.
You can also invite multiple people at a time by entering multiple email addresses separated by commas.
When inviting a new user, ensure that they are added to at least one existing Banno group. Even if your financial institution only uses Users & Groups for Jack Henry Platform solutions, or a particular enterprise user only needs access to Jack Henry Platform products, they still must be added to a Banno group. In this instance, we recommend creating a dummy group with minimal to no permissions to fulfill the one Banno group requirement.
Editing a user profile
To edit an enterprise user’s profile, go to the Users screen, search for the enterprise user’s profile, and select the profile you want to edit. From there, select the more icon and choose Edit profile. From this screen, you may edit the following fields:
- First name (required)
- Last name (required)
- Phone number
- Timezone
- Location (required)
- Bio (required)
You may also remove another enterprise user’s profile photo by hovering over their photo on their user profile screen and selecting Remove. You can only remove their profile photo, not replace it.
Deleting a user profile
From the Users screen, select the profile you wish to delete. Then, select the more icon next to the enterprise user’s name and choose Delete profile. Confirm your decision to delete the user’s profile.
User settings
The settings page for each enterprise user allows you to view their permissions, change the groups they are a part of, and view their recent notifications. If you select yourself, you will also be able to see your security settings, which other enterprise users are not able to see.
Permissions
The Permissions tab allows you to view the status of each permission for the selected enterprise user. Permissions are determined by the groups an enterprise user is a part of, which are listed at the top of the page.
Enterprise users may be part of multiple groups and their permissions can span across more than one product. Find the product in the left-hand Features menu and select it to see which groups the enterprise user is a part of and what permissions they are granted. For Banno groups, the user interface will look a bit different and include an option at the top of the page to change the groups a user belongs to through the Edits groups button. For all other products in the Features menu, you will still be able to see the enterprise user’s permissions and groups, but you will not be able to edit the groups they are a part of from this page. To edit the non-Banno groups a user belongs to, you will need to go to the Groups page and add the user to the group. For a full list of all permissions and their effects, see the Settings permissions doc.
Notifications
The Notifications tab allows you to view all notifications sent to the selected enterprise user. Clicking a notification will open the text of the delivered notification in a new window. If you are unable to view a notification, check the status of any enabled pop-up blockers in your browser, as they can interfere with the new window.
Security
Enterprise users are able to view only their own Security tab where they can change their password or reset their two factor authentication enrollment. If you need to reset 2FA on behalf of one of your team members, you must open a support case.
Groups
Within Users & Groups, the Groups screen houses all groups your team has created for managing permissions. Enabling or disabling permissions is handled exclusively through group membership. When your financial institution first logs into Banno Settings, only one group will exist with all permissions enabled. Members of that group will be able to fill out the rest of the groups your team needs. While you are free to utilize settings however works best for your team, we do have a few best practices to help you get started.
Creating a new Banno group
The Create a group button allows you to create a new group. Select Banno group, enter a group name and description, an optional group that this group reports to, and the ability to require Two-factor authentication for all members of that group. When creating a group, you’ll also select an enforcement date by which all users must have two-factor authentication enabled to continue having access to banno.com.
You may also select a collection of permissions for this group, as outlined in the Settings permissions doc.
Creating a Jack Henry Platform Group
From the Create a group button, select JH Platform group to create a group with permissions for your Jack Henry Platform products or features. Enter a group name and description and select Save to continue. Navigate to the Groups screen under the JH Platform tab to see your newly created group and add your desired permission sets. Permission sets are exactly what they sound like: a collection of permissions that can be applied to a JH Platform group.
Editing Banno groups
Clicking an existing Banno group will give you access to the options available in the Create a group section. In addition, you will be able to view all members of this group through this screen. Changes to group settings will not take effect until the Save button is clicked.
From this screen you may also delete the group by selecting the delete icon.
Editing Jack Henry Platform groups
Selecting the group you wish to edit will give you the option to add permission sets, add users to the group, or edit the group details such as name and description.
Managing permission sets for Jack Henry Platform groups
How you manage your JH Platform groups’ permissions is entirely up to you. We designed the system to allow you maximum flexibility so you can choose which setup works best for your financial institution.
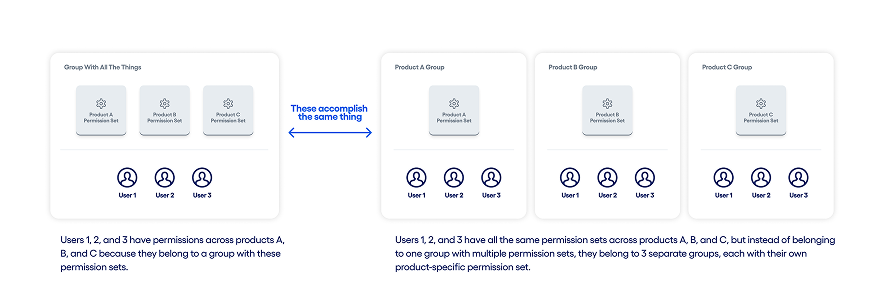
Because JH Platform groups allow you to assign permission sets to a group across multiple products, you can either create one group with permission sets for multiple different products (like a group for admins or tellers for example) or you could choose to create separate, product-specific groups and have an enterprise user belong to multiple groups depending on which products they need to access.
Here is a generic visualization to show the two different ways you could manage enterprise user permissions, depending on how you set up your groups:
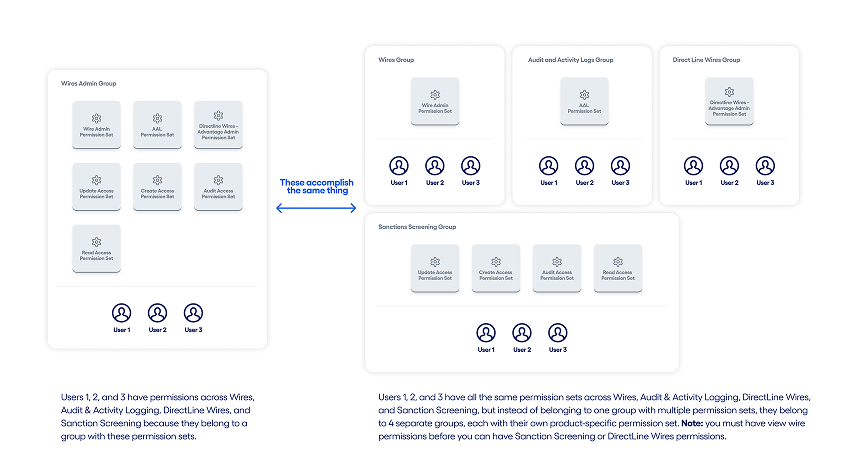
Here is another visualization with real permission set examples to demonstrate what group management could look like for the Jack Henry Wires product:
Creating permission sets
Permission sets enable you to create preset permissions for specific products which can then be applied to groups. Rather than needing to create or modify a group’s permissions each time you need to configure permissions for a product, you can use permission sets to apply multiple product-level permissions to a group at once.
To create a permission set, go to the JH Permission Sets tab on the Groups screen. This tab shows the available permission sets for different products listed on the Features menu. Select the Create a permission set button to add a new permission set for a product. From there, you can name the permission set, add a description, choose what product it applies to, and select which permissions to enable.
Each permission has a Grant, Unset, or Block option. Permissions are set to Unset by default. Selecting Grant enables the permission, while selecting Block disables the permission regardless if the user is part of another group that grants it. The Unset option doesn’t explicitly give the user the permission, but it does allow the user to have the permission if another group gives it to them.
Duplicating a permission set
When creating a new permission set, there is an option to Duplicate from existing set. When this box is checked, you will see a new dropdown menu that allows you to select from existing or templated permission sets. Existing permission sets are ones already created by your financial institution (if applicable) and templated permission sets are ones created by Jack Henry product teams to help get you started. Not every product will have templated permission set options, but for those that do, templates will have “(template)” listed in the name.
Once you select what permission set you want to duplicate (existing or template), you will be able to see what permissions it has enabled and make changes to it as needed. When you’re ready, select Create to save it. To enforce the permissions for specific users, make sure they are part of a group with the permission set assigned to it.
Editing permission sets
To edit a permission set, select which one you want to edit from the JH Permission Sets tab on the Groups screen. Select the Edit permissions button to make your changes and choose Save when you’re finished to record your changes.
FAQ
- What is the difference between Banno groups and JH Platform groups?
- Users & Groups has always been Banno’s way to manage what enterprise users can and cannot access within Banno products, but this need to manage enterprise user permissions is not unique to Banno. Rather than having several products each with its own authorization framework, we created a new Authorization Management Service (AMS) and integrated it into Banno Admin’s user interface for centralized authorization management across various Jack Henry products. If you have products that use AMS and you belong to a Banno group that gives you the necessary permissions to view, create, and edit groups, you will see a JH Platform groups option and be able to manage those groups’ permissions.