Deploying Banno apps
We make sure that distributing new versions of your app is as easy as possible. For the most part, there won’t be a lot to do on your end when it’s time to send your customers the newest and coolest features available! But sometimes, new requirements come in from Google Play or the Apple App Store that require some additional configuration on your end. When those times come, we make sure to give you the full rundown on what you need to do. We’ll send you anything you need to do directly through a monthly update, but in case you lost your email, we’ve got those updates covered below.
Certificate renewal
If there are any issues with the renewal process, an engineer will contact your institution. For Online certificate renewal questions, you can email launchcontrol@banno.com.
Banno
Our engineers take the certificate renewal process off your plate by automatically handling it. They have all required renewal dates on their calendar and it requires no action from your institution.
Engineers begin the renewal process two to four weeks out and install certificates about a week before expiration. As we order and install a certificate for Banno Online or CMS, your institution receives emails sent to the same address we used for validation when initially setting up your institution’s certificates (ex. postmaster@domain.com, admin@domain.com, etc). If you receive a validation email that sends at the same time we order a certificate, you can validate it or wait for us to validate the certificate on our end. After it’s validated, you will receive an email with the certificate.
Institutions
Overall tasks your institution manages include:
- Accepting your Apple agreements.
- Having a valid Apple Developer membership and completing any related requirements.
- Delegating the correct permissions to Banno.
Update app descriptions
Android
At any time, update the the Android description in the Play Store. The short description has an 80 character limit, and the long description has a 4,000 character limit.
iOS
Update the iOS description by opening a support case and letting us know exactly what you want in the description. We’ll update the description so that it displays in the next release. There’s a 4,000 character limit, and the first 170 characters display as the short description.
In order to setup your application for priority deployment, you’ll need to generate a deployment key from your Google Play Developer Account and send us that key securely through jSource. If you have multiple Banno Mobile applications under the same Google Developer account, you will only need to generate a single key for use with all of the apps.
- Open a browser and log in to the Google Developer Console with your Account Owner credentials.
- Open a new tab and paste in https://console.cloud.google.com/welcome.
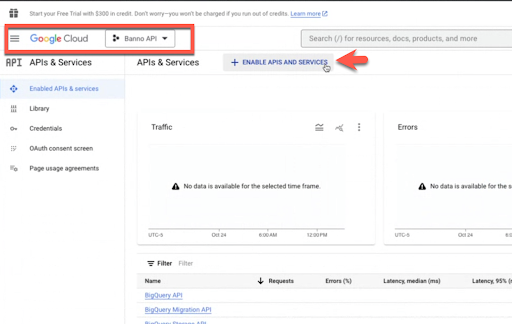
- Click on the dropdown next to GoogleCloud to create a new project.
- From the popup window, click New Project.
- For the Project name field, enter Banno API.
- Leave the Location field as it displays.
- Click Create.
- Click on APIs & Services.
- Ensure you have the correct API (Banno API) selected next to GoogleCloud, and click + ENABLE APIS AND SERVICES.
-
Scroll down to the Mobile section, and click on Google Play Android Developer API.
-
Click Enable. The API/Service Details screen displays.
-
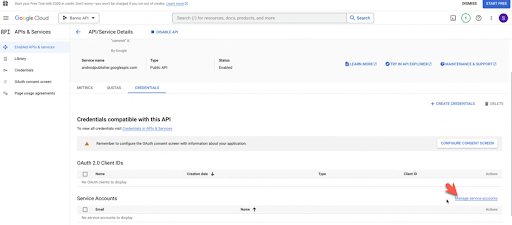
In the API/Service Details screen for Google Play Android Developer API, click on the Credentials tab.
-
Click on Manage service accounts (API/Service Details > Credentials compatible with this API > Service Accounts > Manage Service Accounts).
- Click + CREATE SERVICE ACCOUNT.
- If an Updates to Terms of Service window appears, select No for the email updates and click the Terms of Service checkbox. Then click Accept.
- Service Account Details
- Service account name: Google Play API
- Service account description: For Banno
- Click Create & Continue.
- Grant this service account access to the project:
- Click the Select a role dropdown. Scroll almost to the bottom to find the Service Accounts option. Select the Service Account User role.
- Click Continue.
- Grant users access to this service account:
- Skip Service account users role and Service account admins role boxes.
- Click Done.
- Locate the newly created service account on the Service Accounts page and copy the email for the new service account. You’ll paste the email in a later step.
- Click the three vertical dots on the right-hand side and select Manage keys.
- Click Add key.
- Click Create new key.
- Set the key type to JSON and choose your download destination.
- Click Close once the JSON file is saved.
- Close the Chrome tab that the Service Accounts page is open on.
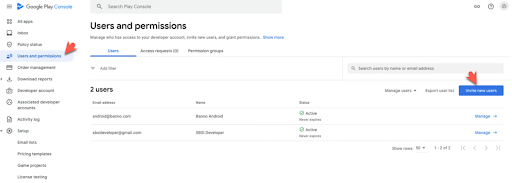
- Go back to the original tab you started working in, click Users and Permissions in the sidebar
- Add the email address you copied from step 18 above to the Email address field.
- Click on Account permissions under the Permissions section, and check Admin (all permissions).
- Click Invite user.
Now, with your newly generated Android Deployment key, navigate to jSource where you’ll upload the key that was downloaded to your computer. Support will then upload this key to our deployment pipeline, confirming it’s a valid key.
Done! You’re now setup for automated Android deployments.
-
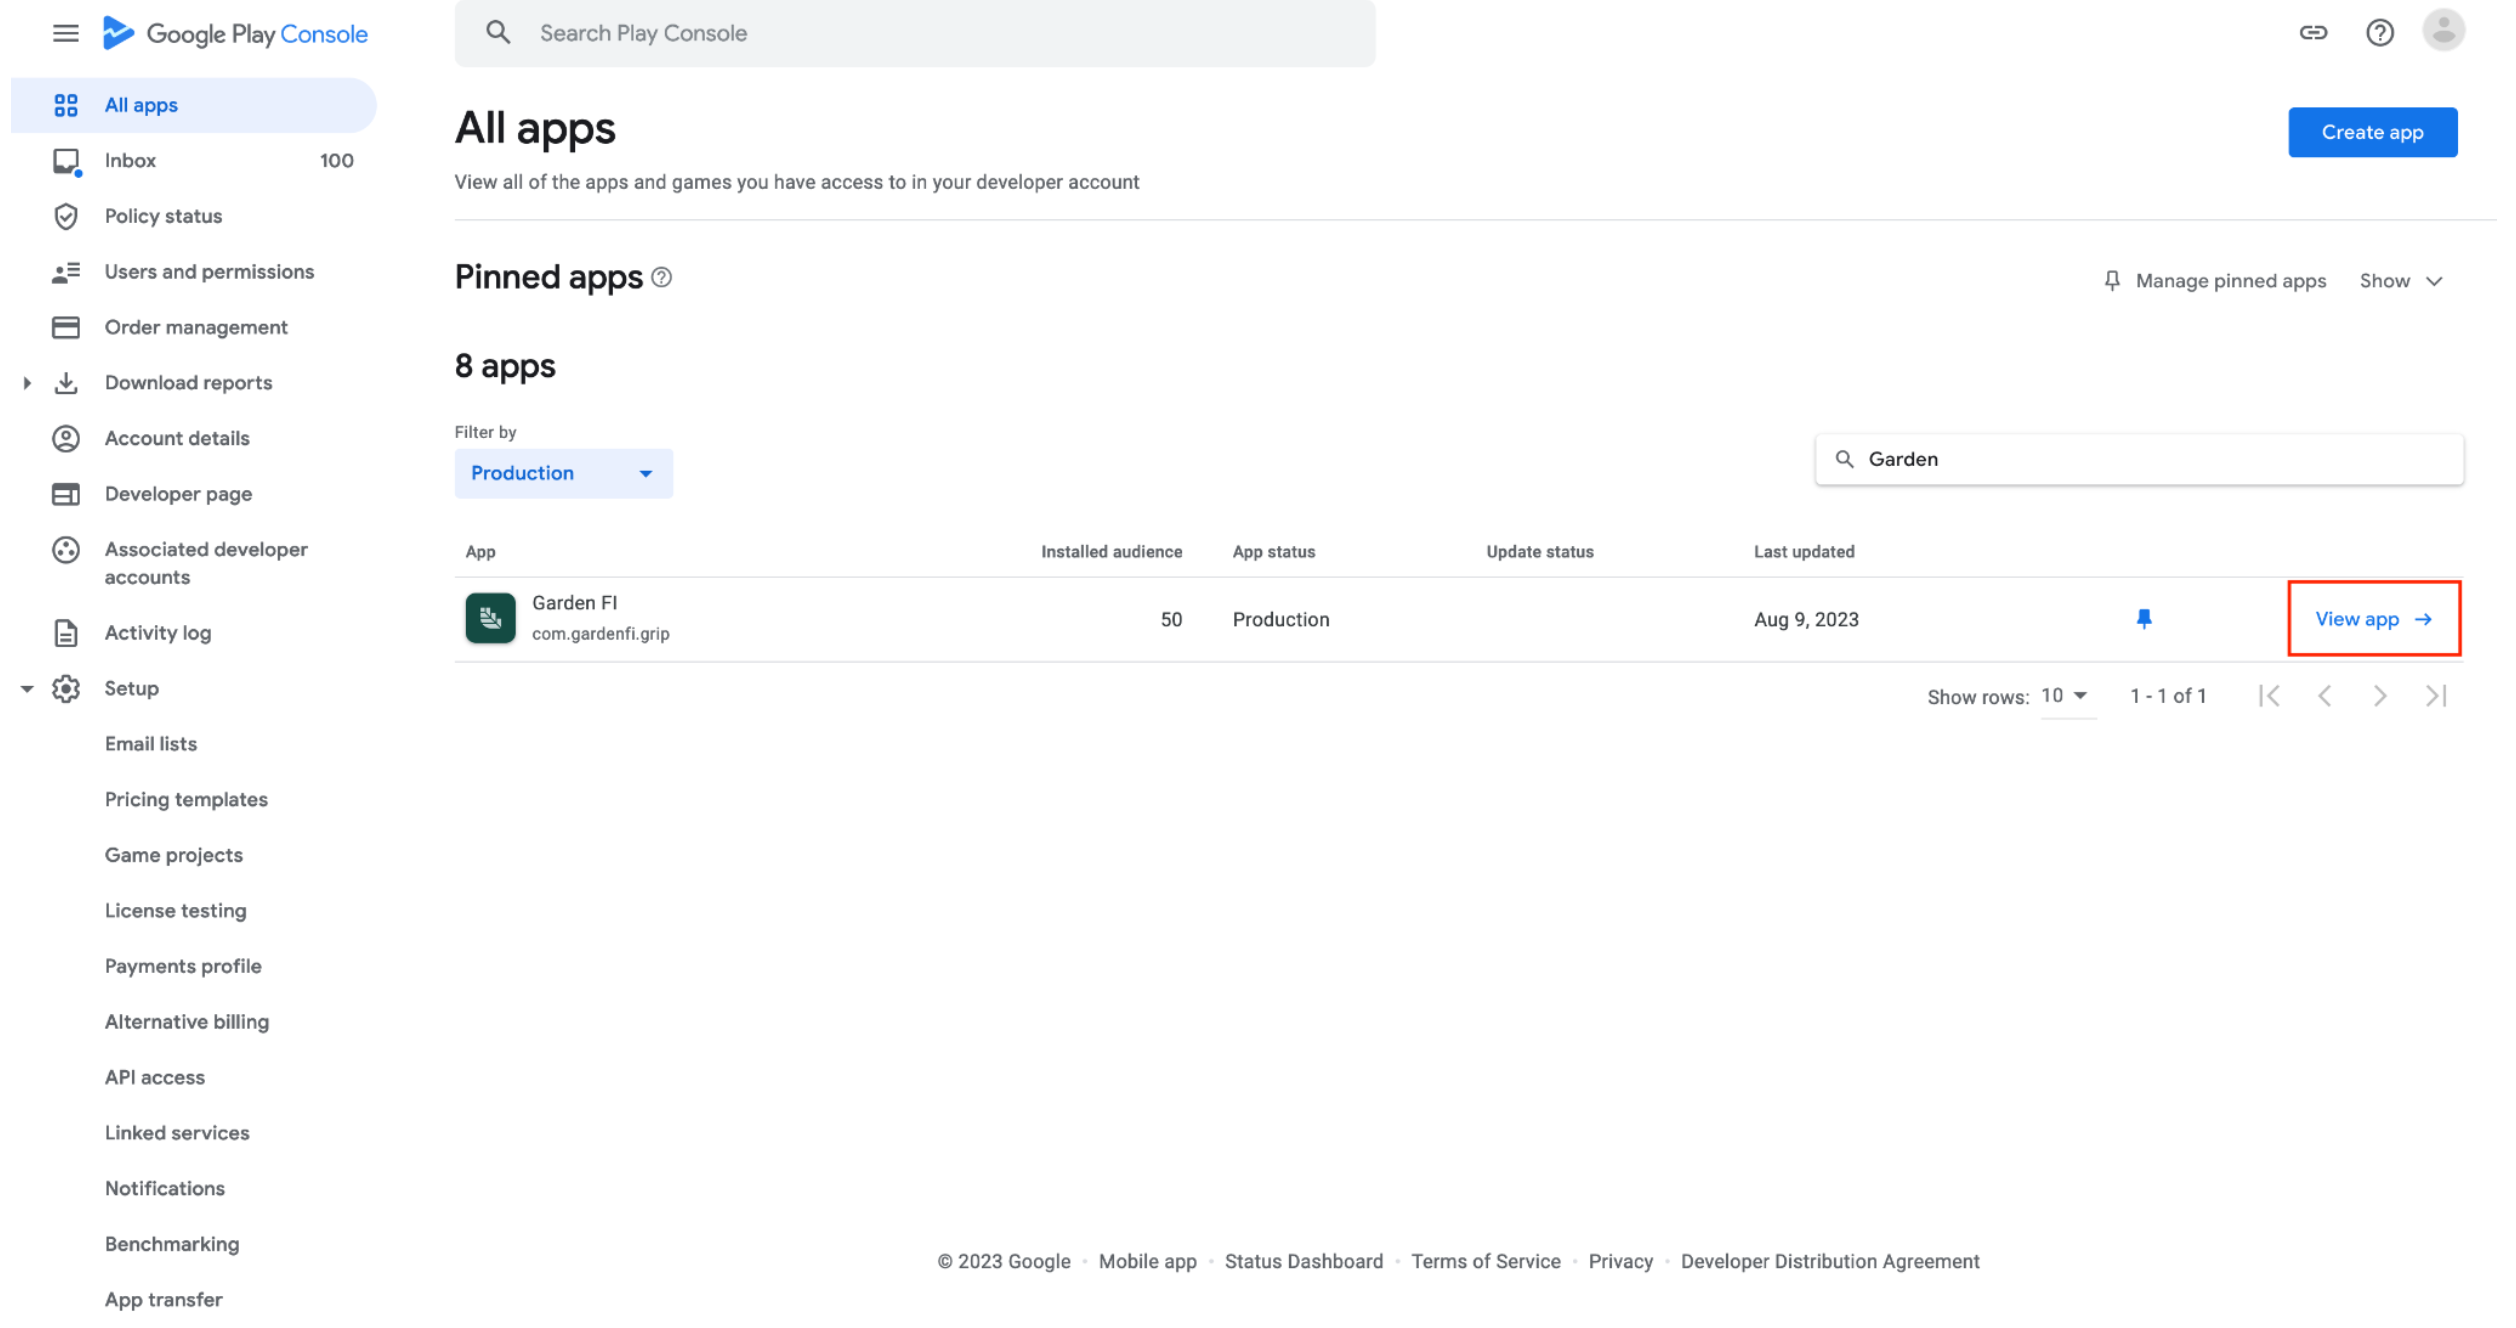
After logging into Google Play, you’re presented with a list of your applications. Choose the application you’d like to complete by clicking on View App. These steps will need to be completed for all of your live applications, not just Jack Henry applications.
-
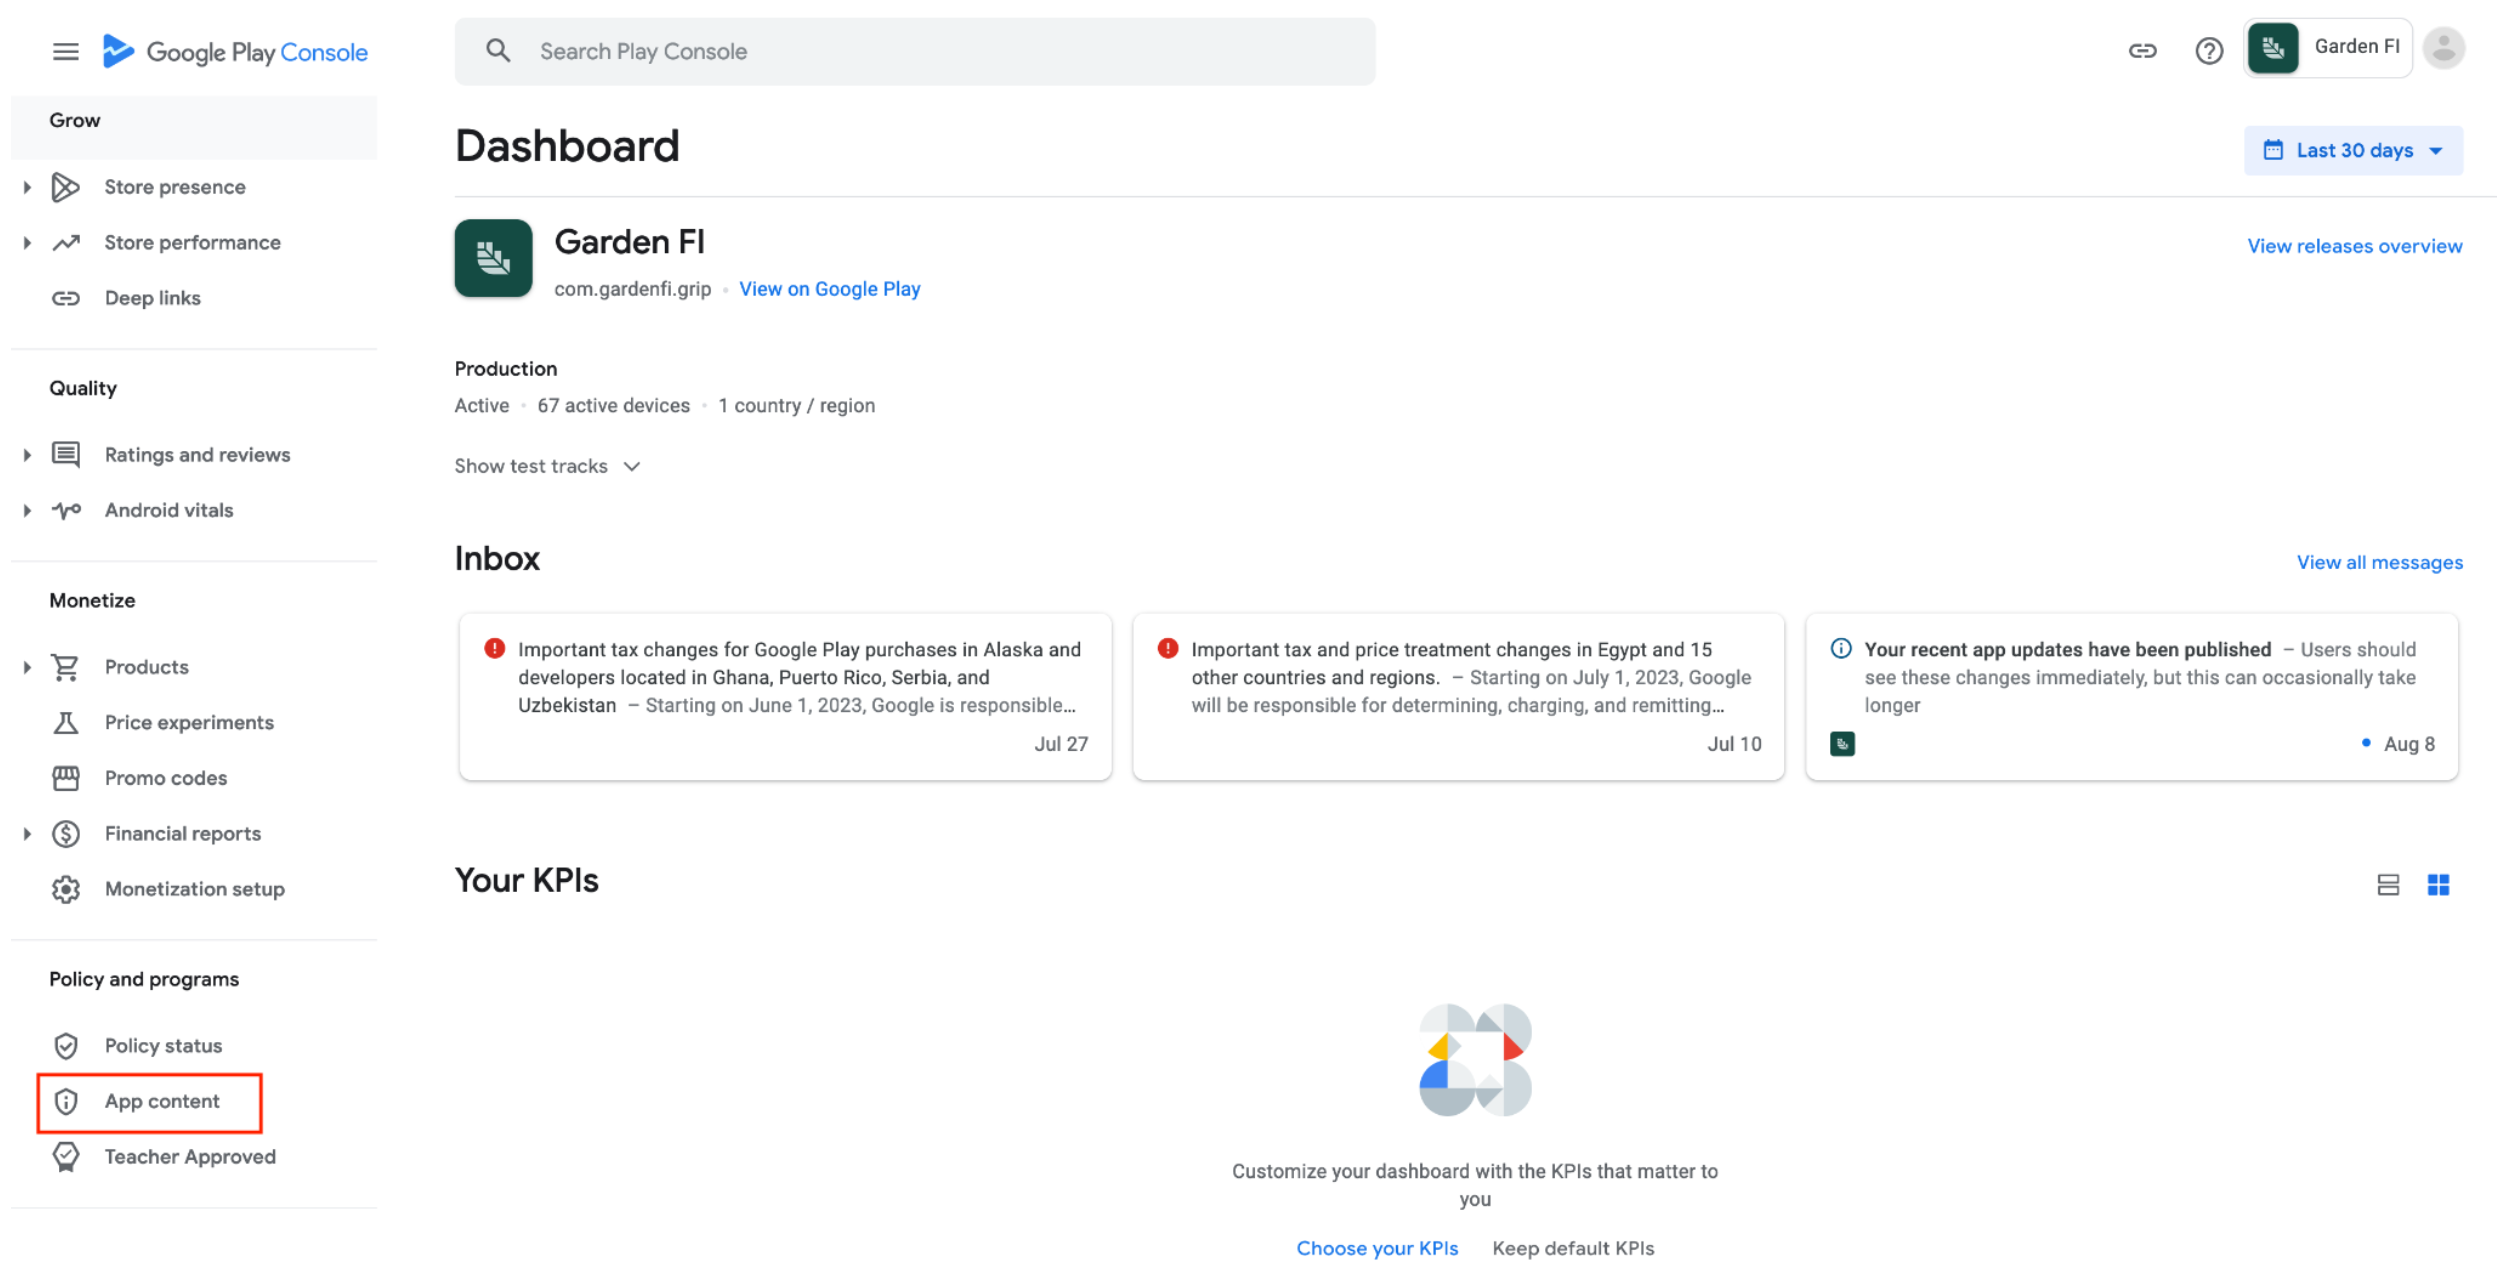
Scroll down to the bottom of the left sidebar and click App Content.
-
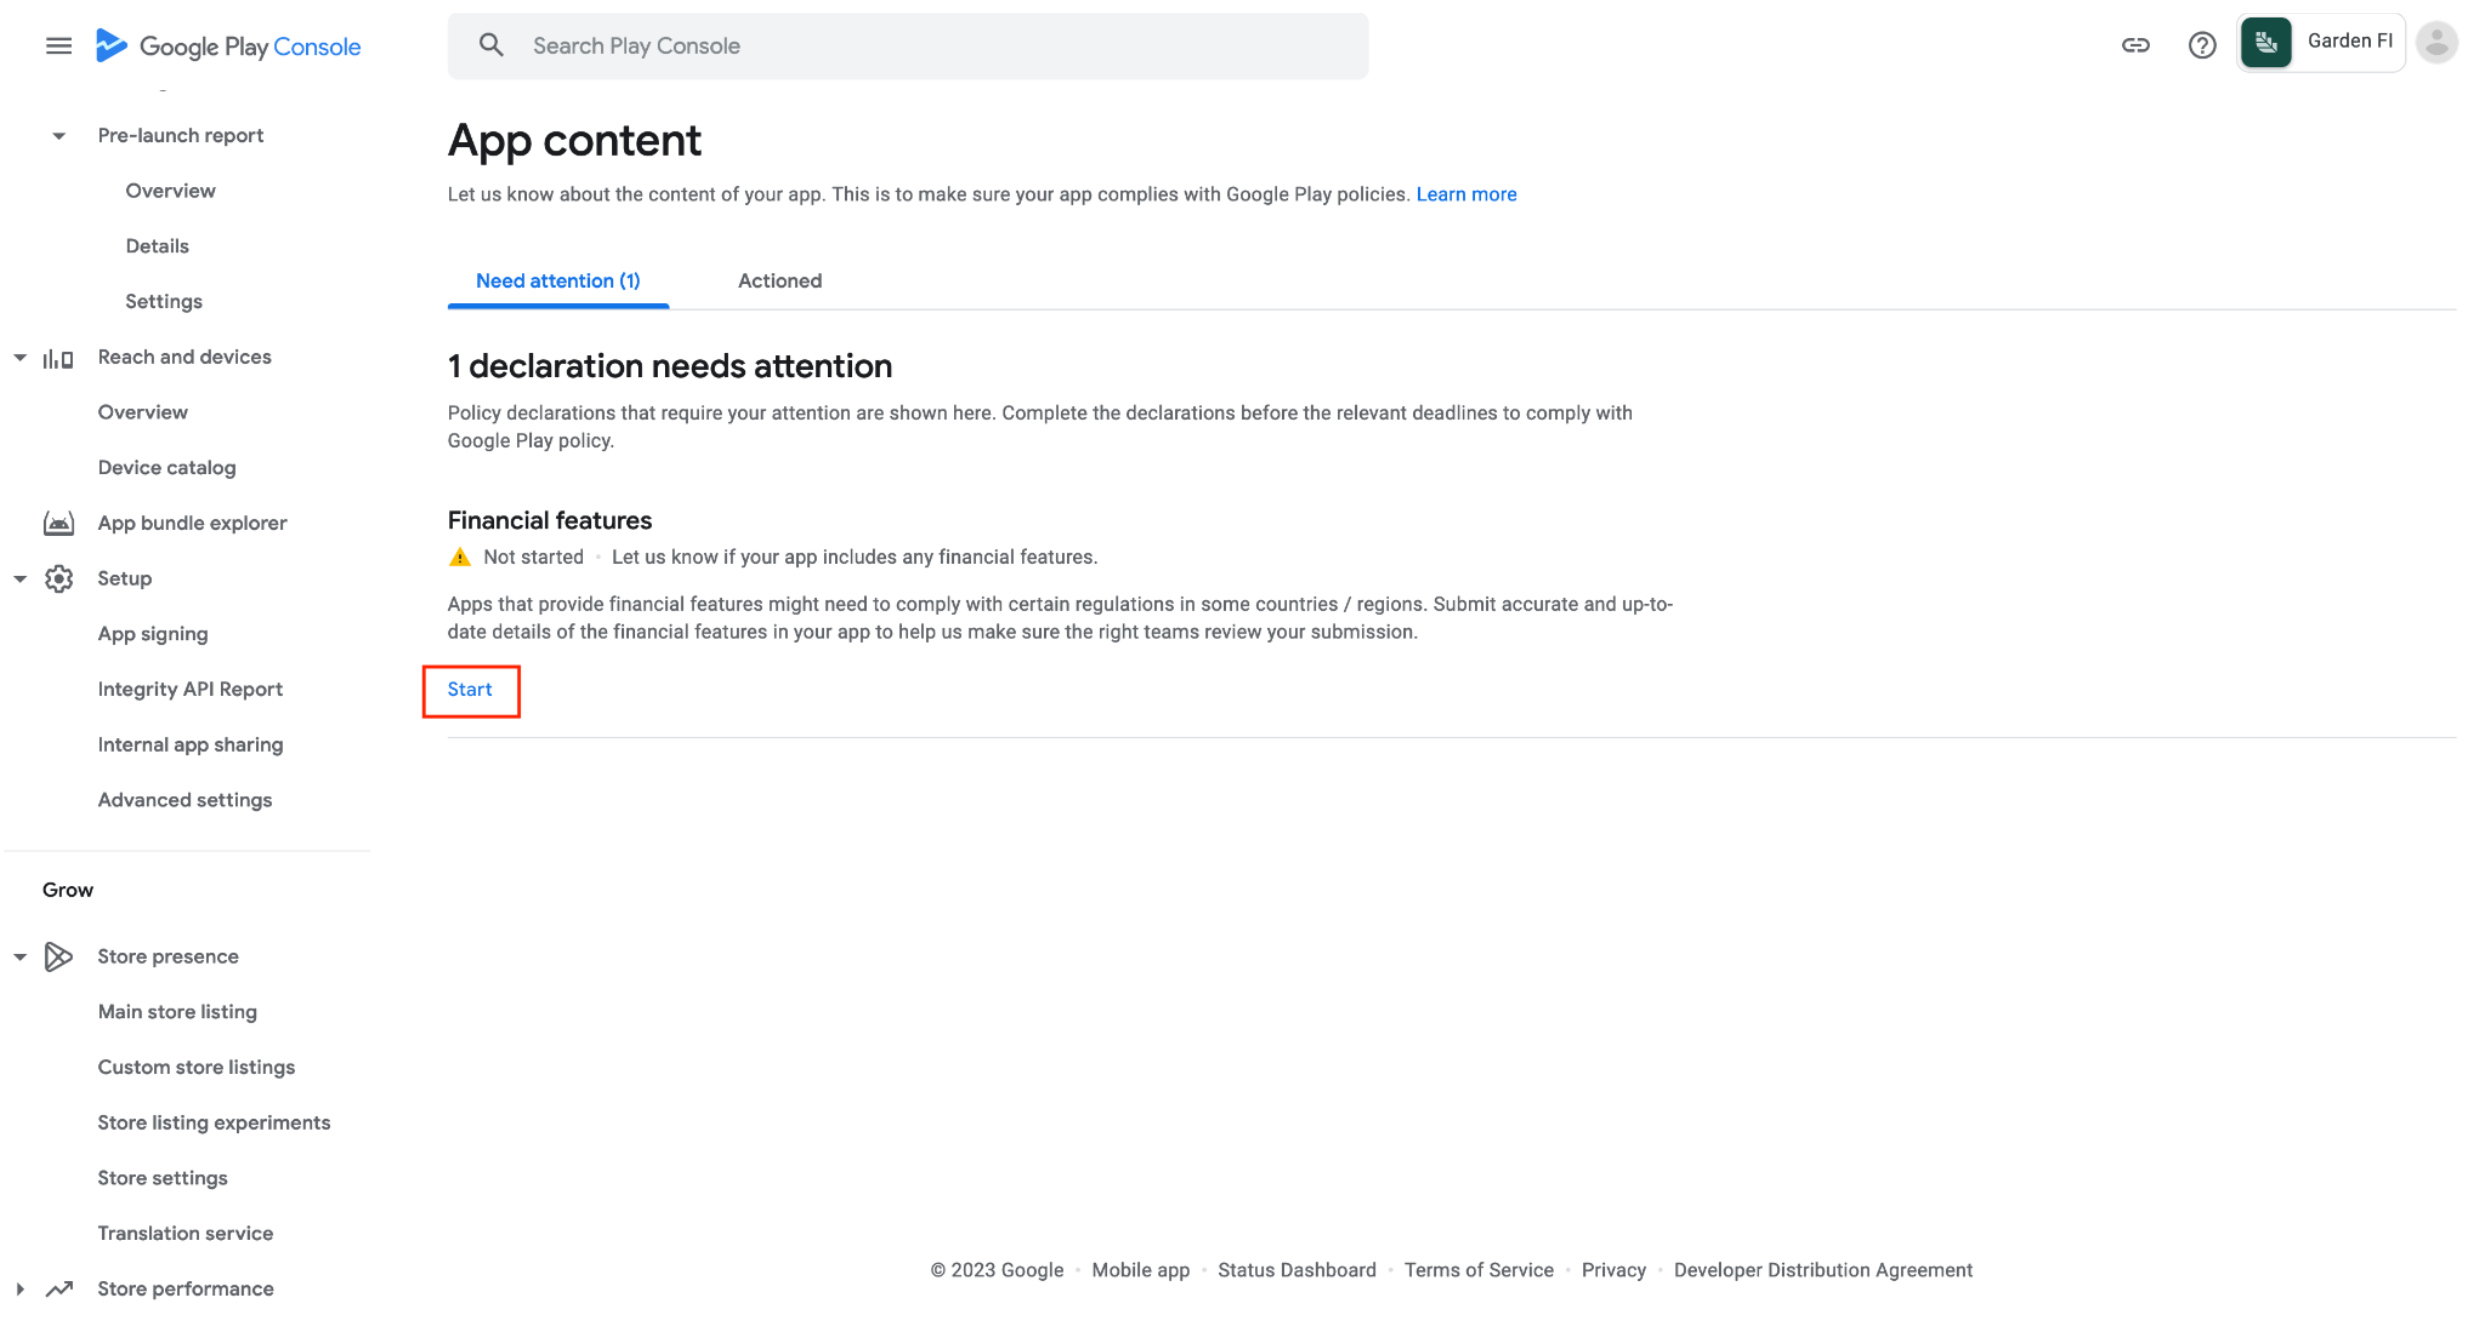
You’re then presented with a page stating that the Financial features declaration needs attention. Click Start on the Financial features declaration. The console may state that there is more than one declaration that needs your attention but you need only be concerned with the “Financial features” declaration. We’re in the process of working through the other outstanding declarations internally, the deadline of which is December of this year. We’ll likely be complete with these changes by the end of September.
-
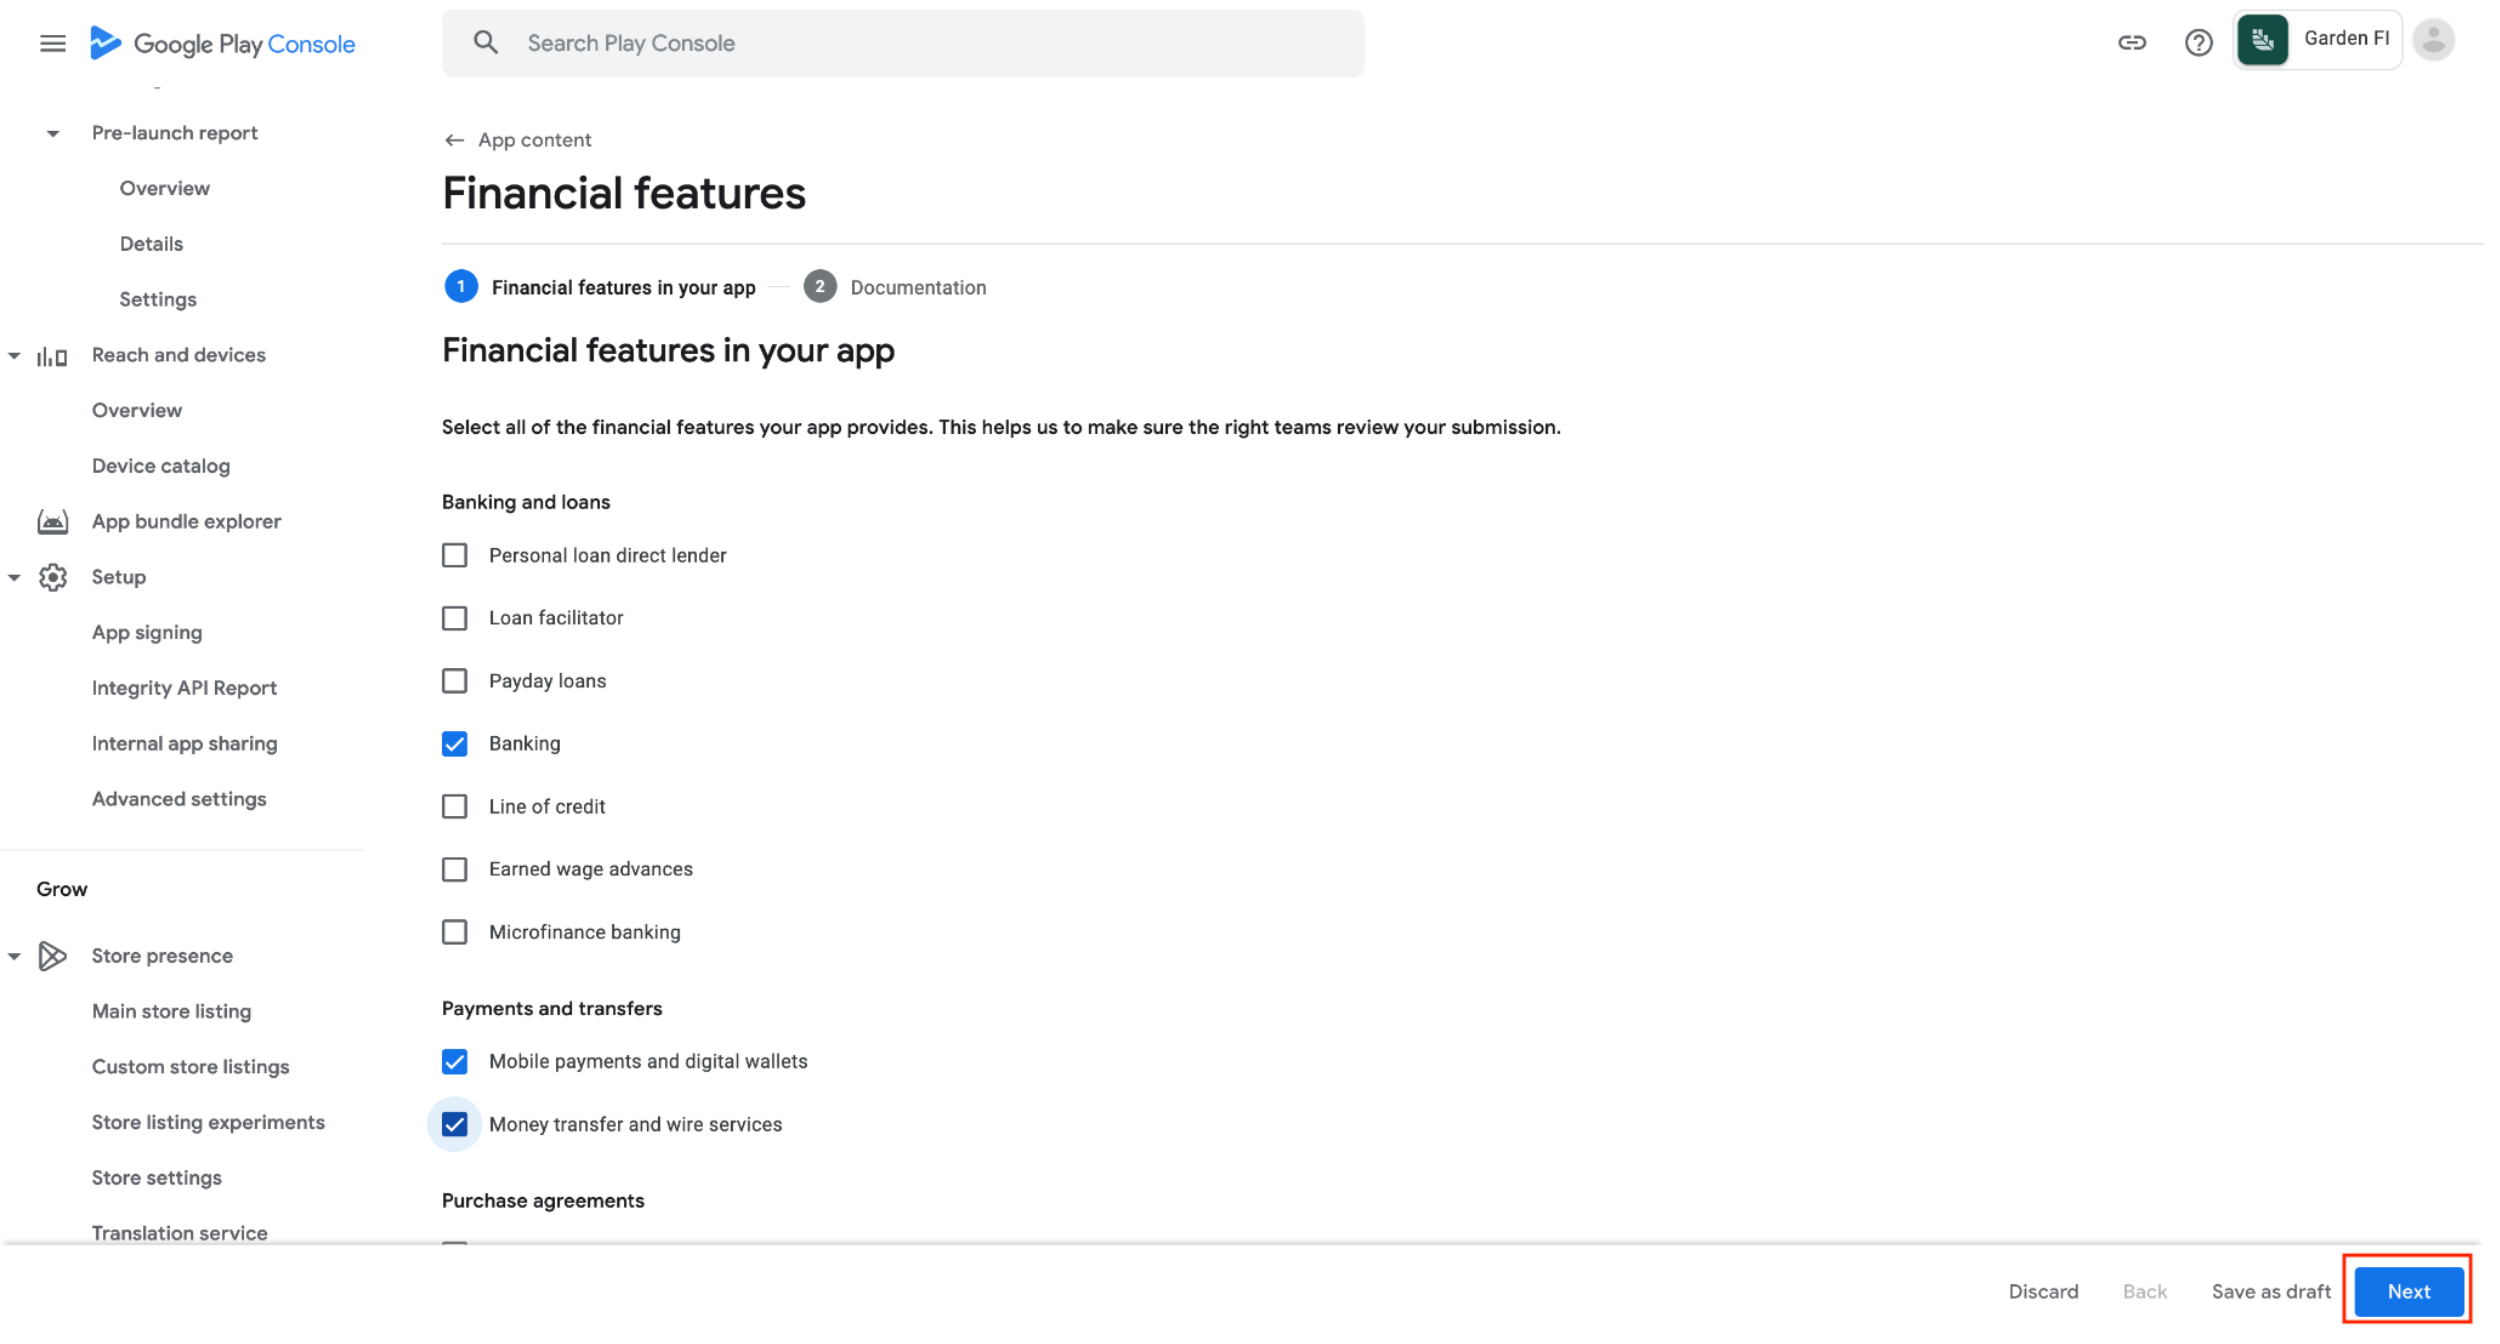
You’re then presented with the actual form. Fill out the form by checking the boxes of the features you provide directly in the application. This includes features available from your plugins and SSO options. Click Next once you’ve reviewed the entire form. If you provide any of the following from within the application, you’ll have to provide further documentation to Google about the lending provider:
- Personal loan direct lender
- Loan facilitator
- Payday loans
-
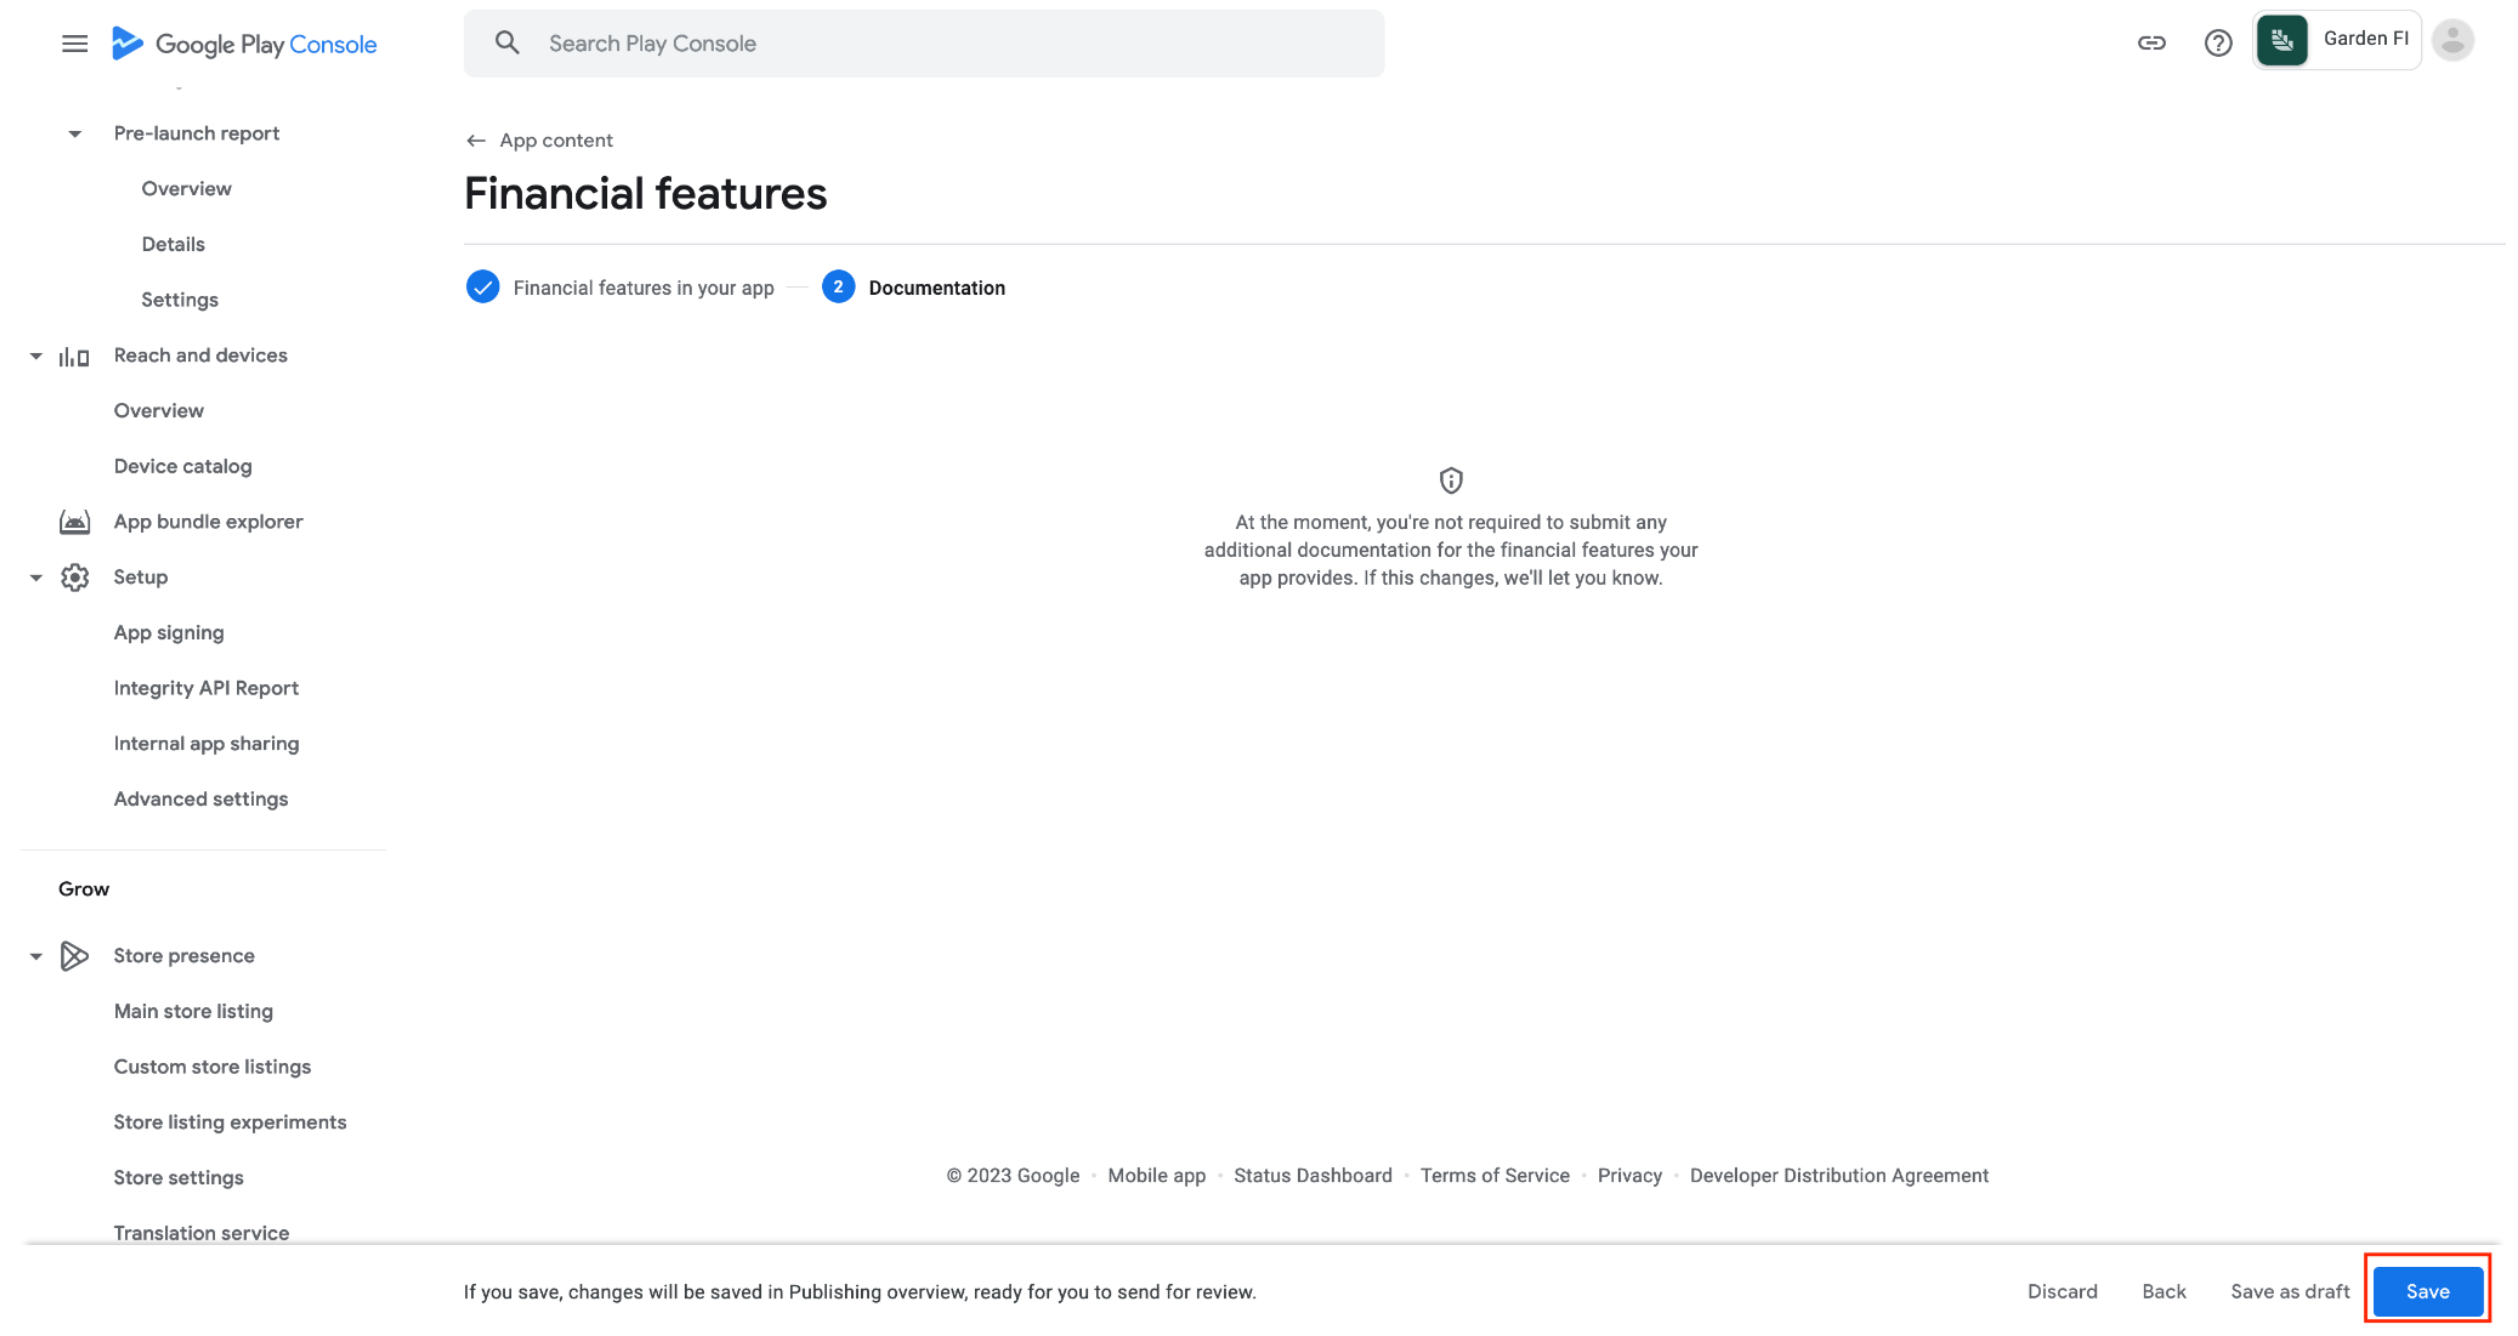
Unless your app has any of the features mentioned in step 4, you’ll be presented with a screen stating that you do not require further documentation. If you’re required to provide further documentation, please walk through that process. Once you’re done, click Save on this page.
-
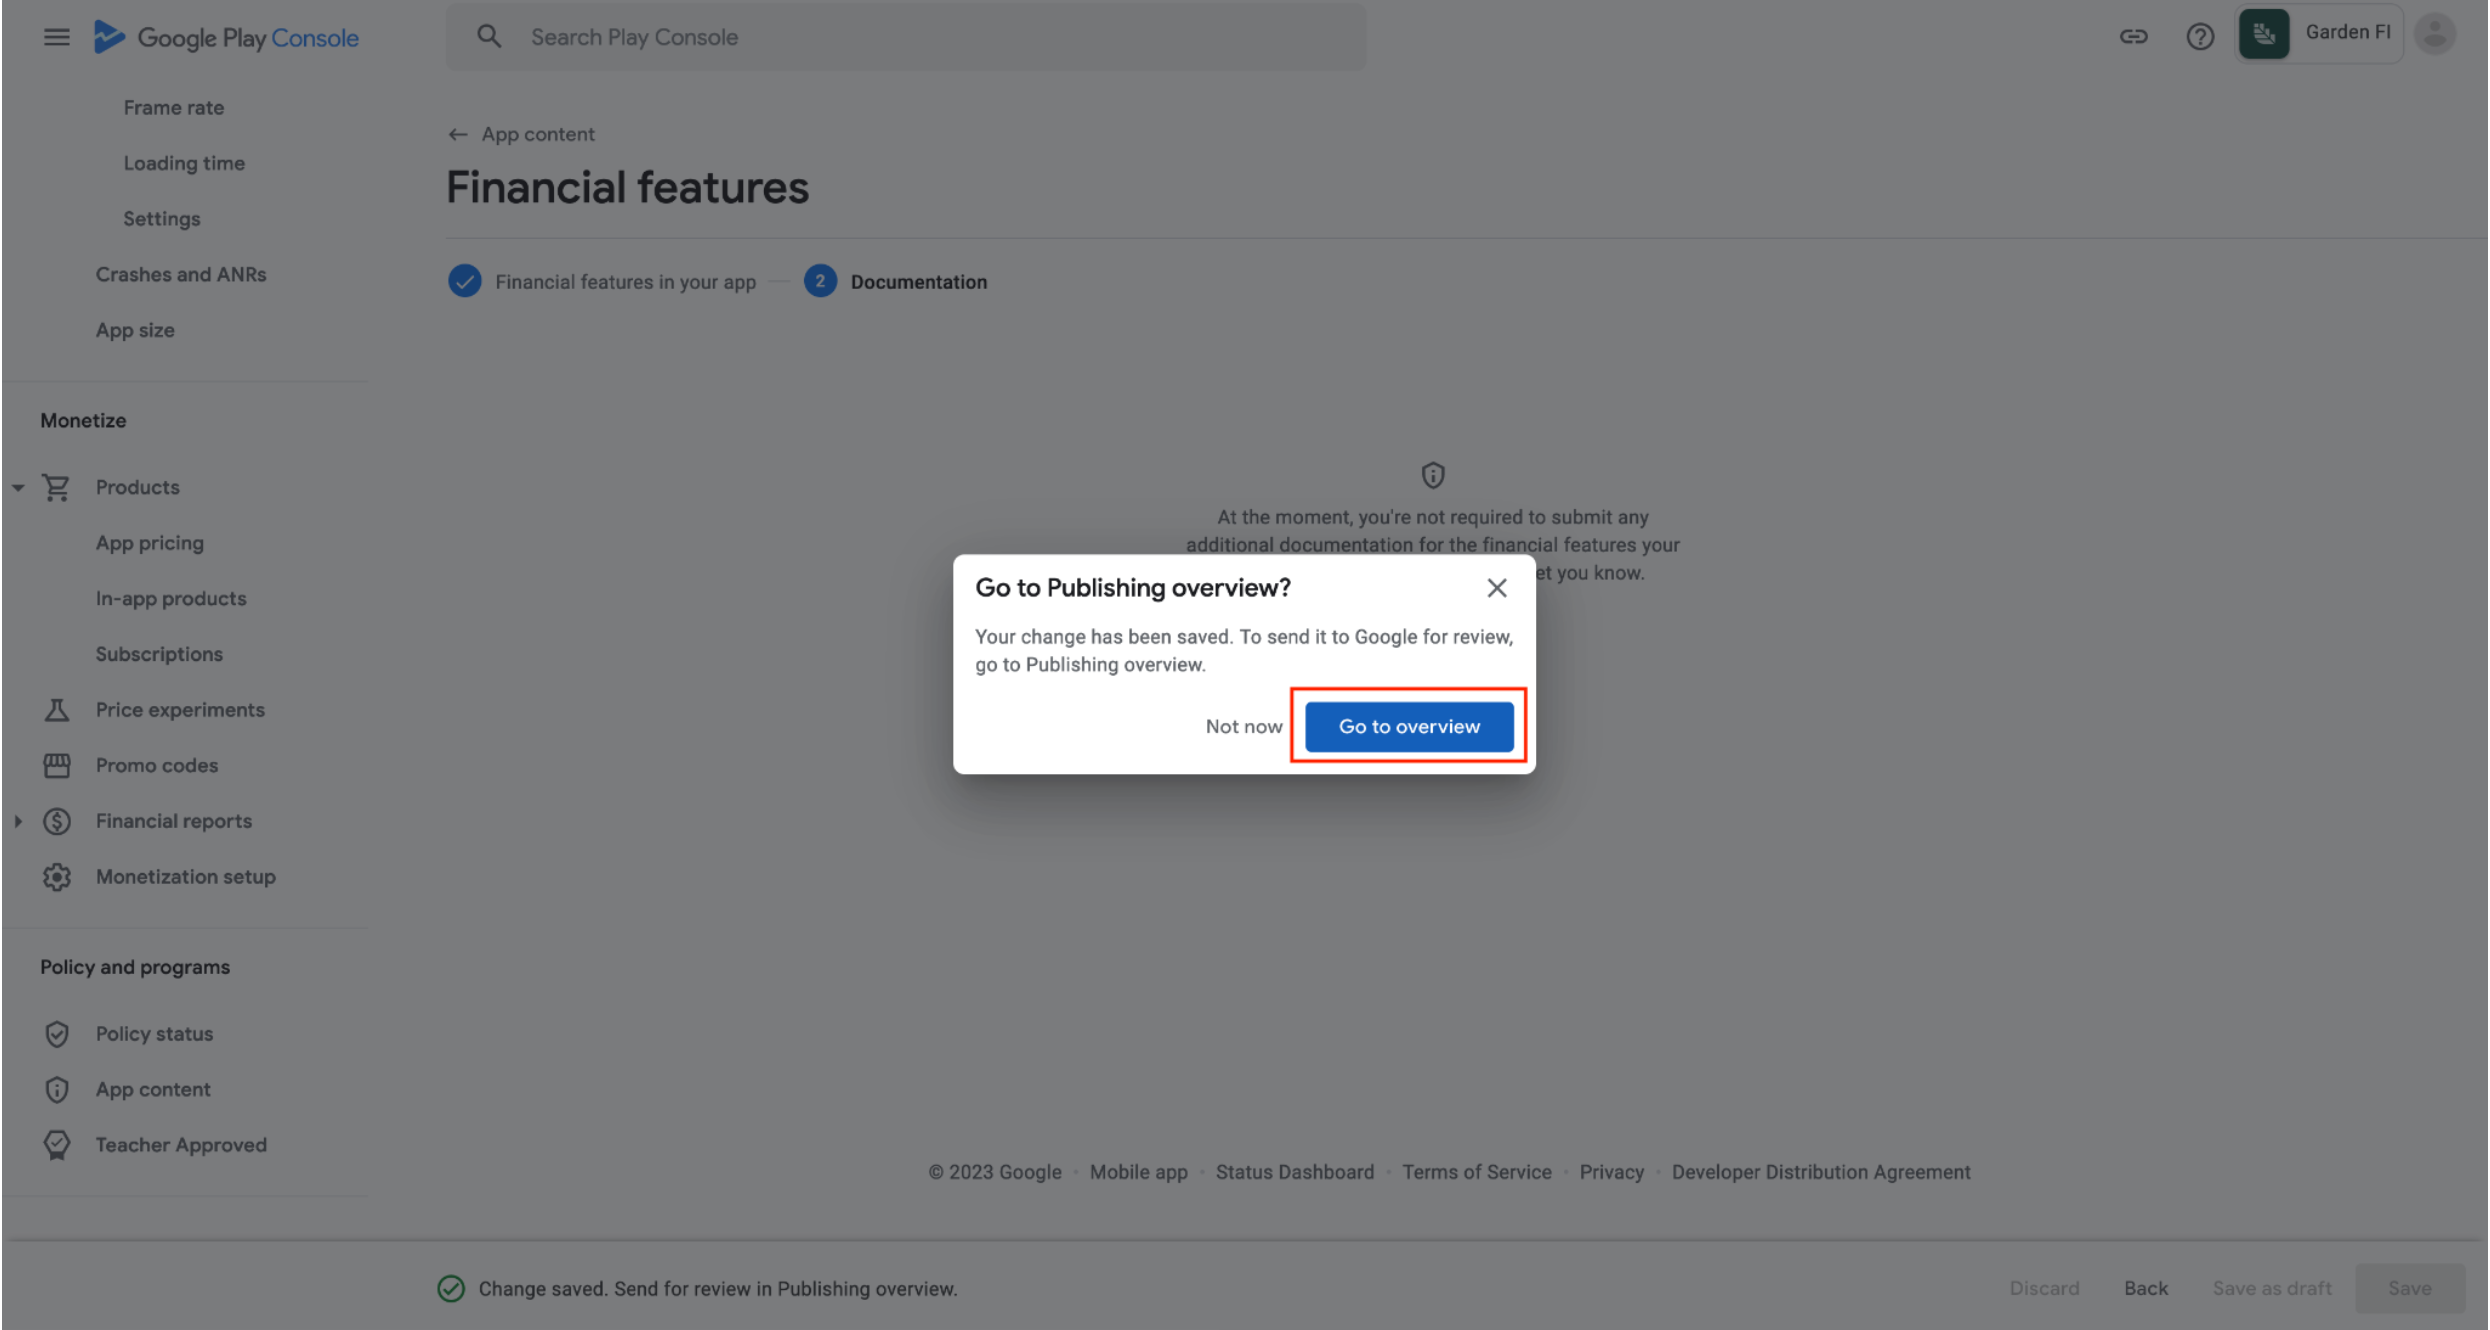
You’ll the be presented a modal, click Go to overview
-
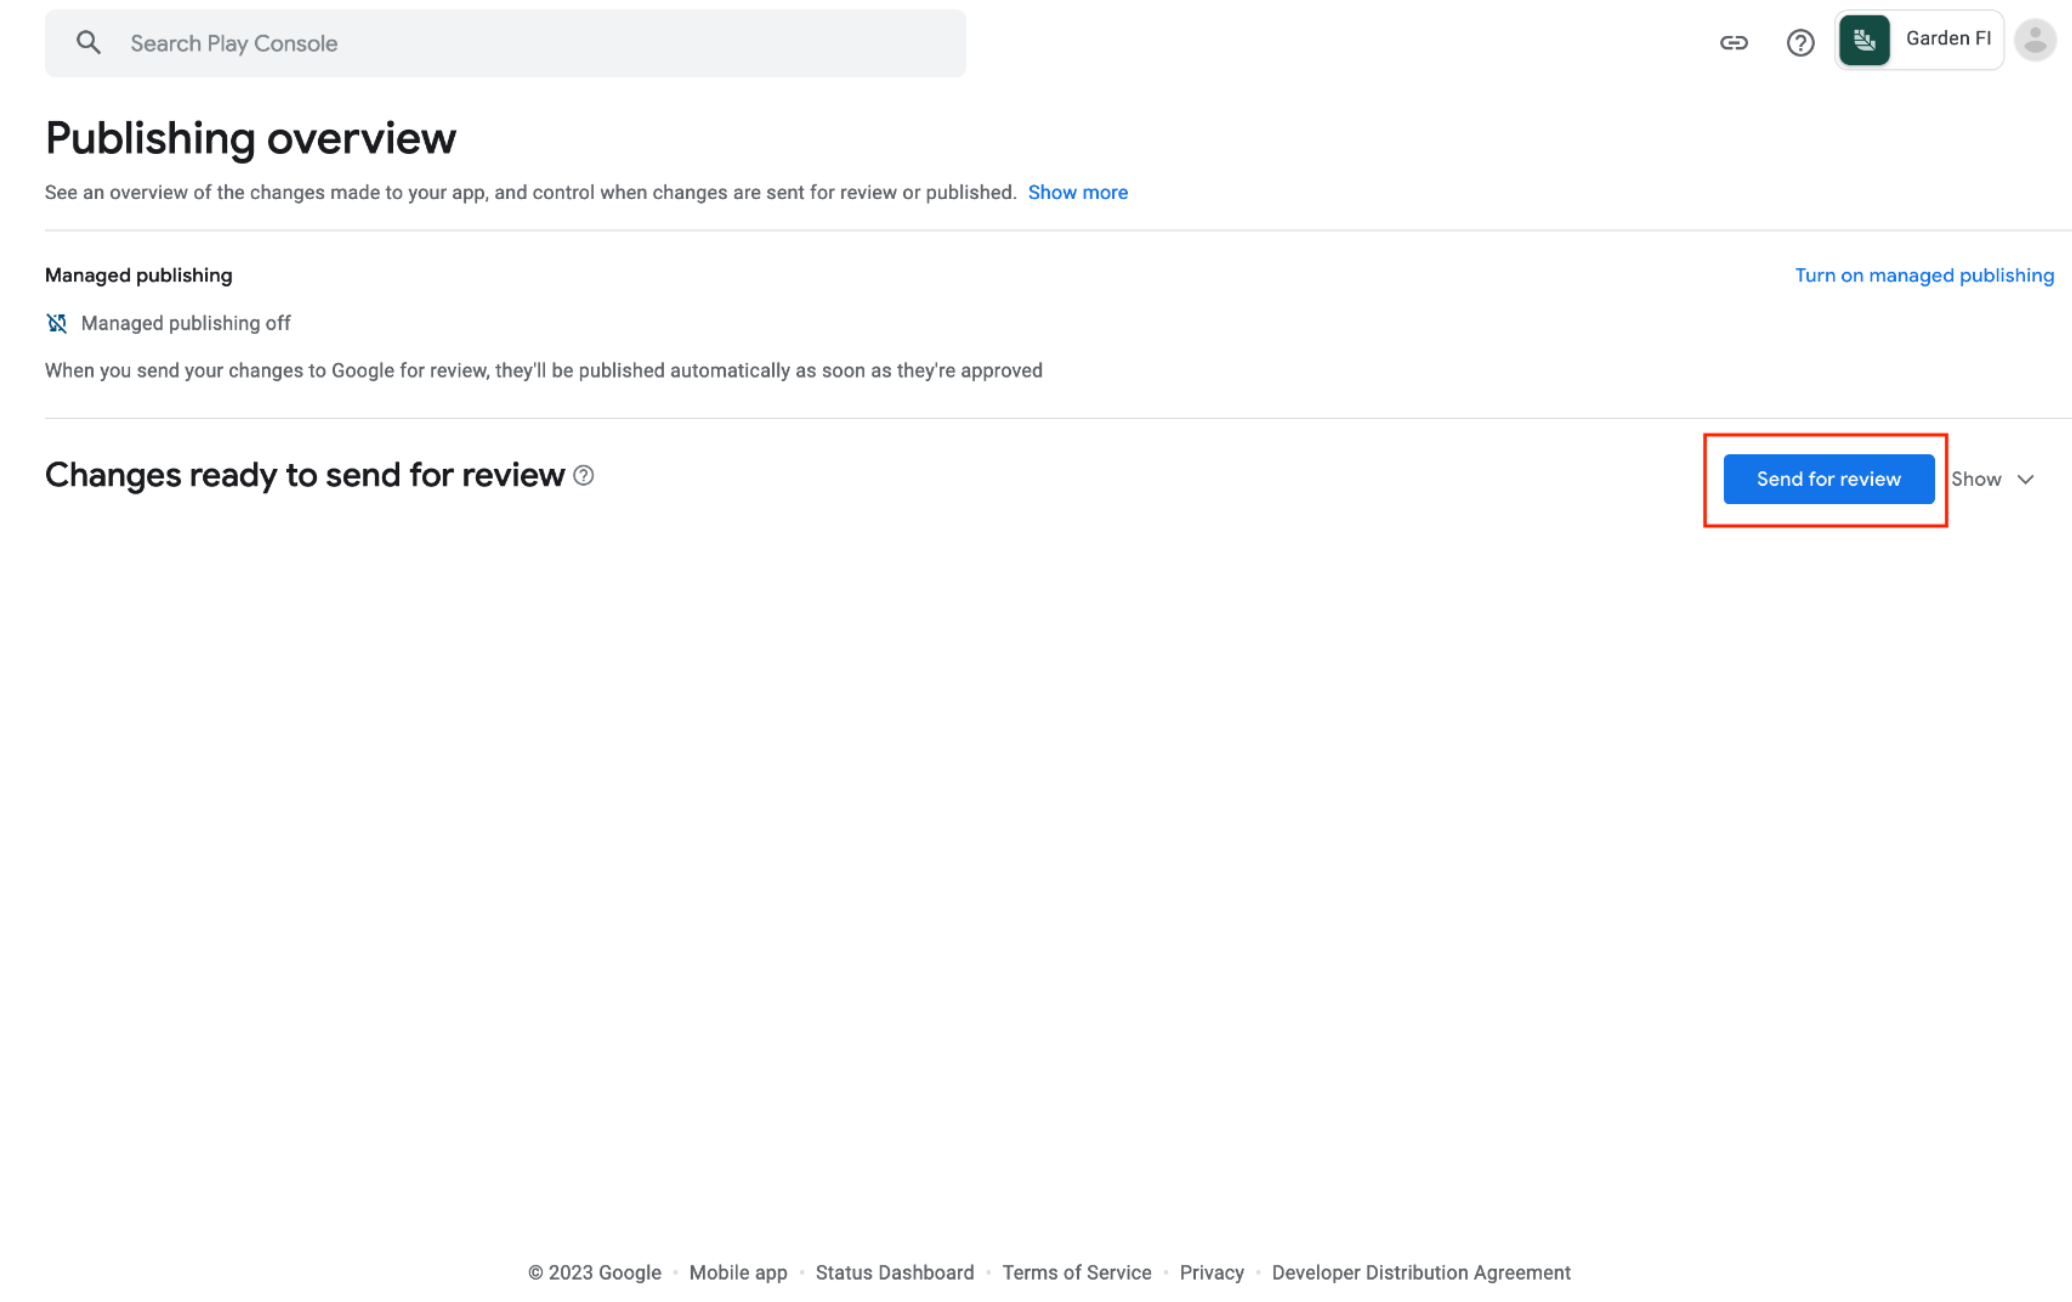
Once you click, Send for review, you’ll be done with the financial features form.
It’s important for your end users to get new builds as quickly as possible. Whether they’re getting vital new features or the hottest performance improvements, we can ensure your end users always have the newest builds as soon as they’re available. Better still, setting up the App Store Connect API Keys that make this possible is a straightforward process, and we’ve outlined it below.
Enabling App Store Connect API key generation
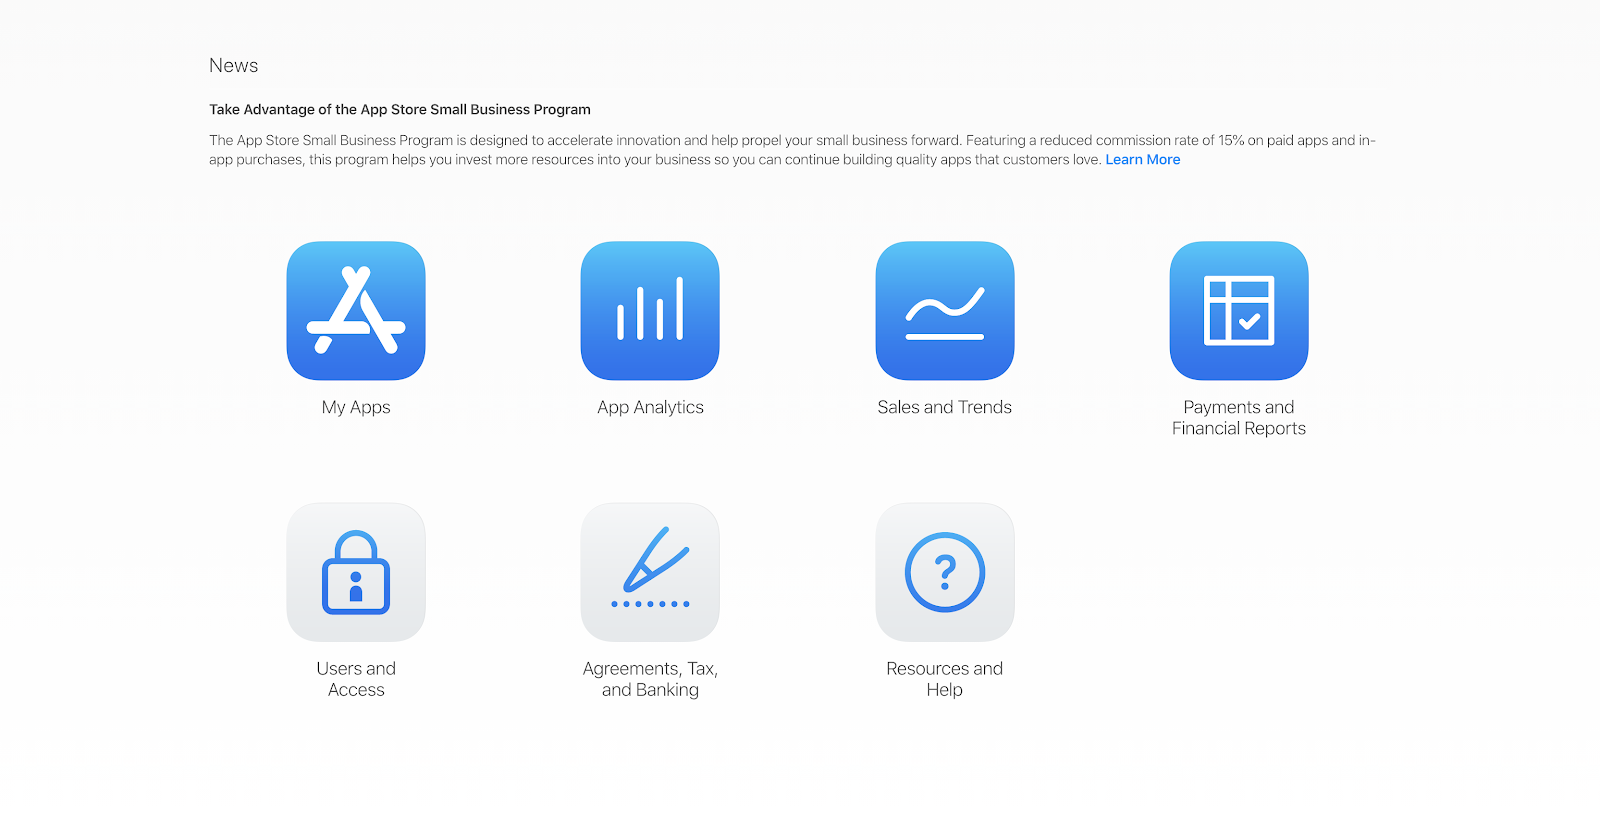
First, you’ll need to log into App Store Connect.
Select Users and Access (1) to continue.
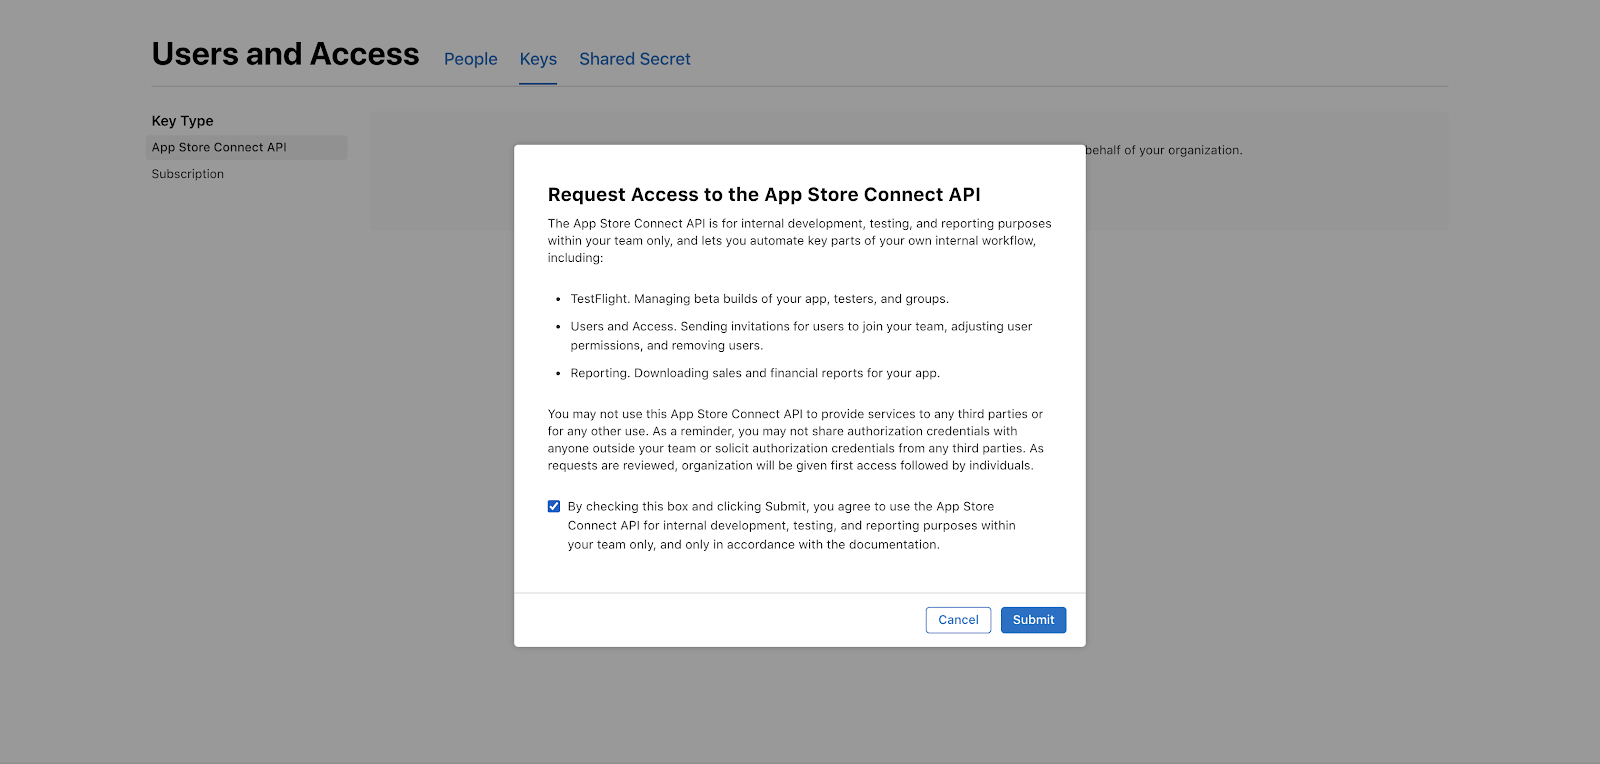
Select the Keys heading (1), then the Request access button (2), which displays the submission dialogue.
Check the agreement box (1) and click Submit (2) to see your App Store Connect API approval.

This screen means your setup was successful and your job is done! If you have any questions, contact your support representative.
Banno is a pretty amazing platform for for community banks and credit unions, yet we understand you might find a reason to change. If your institution migrates from Banno, your end users can be guided with a hard or soft prompt to download a link that acquires the new mobile app. At the start of your migration, you’ll work with Banno Support to configure which prompts and messages are right for you.
How does it work?
Soft prompt
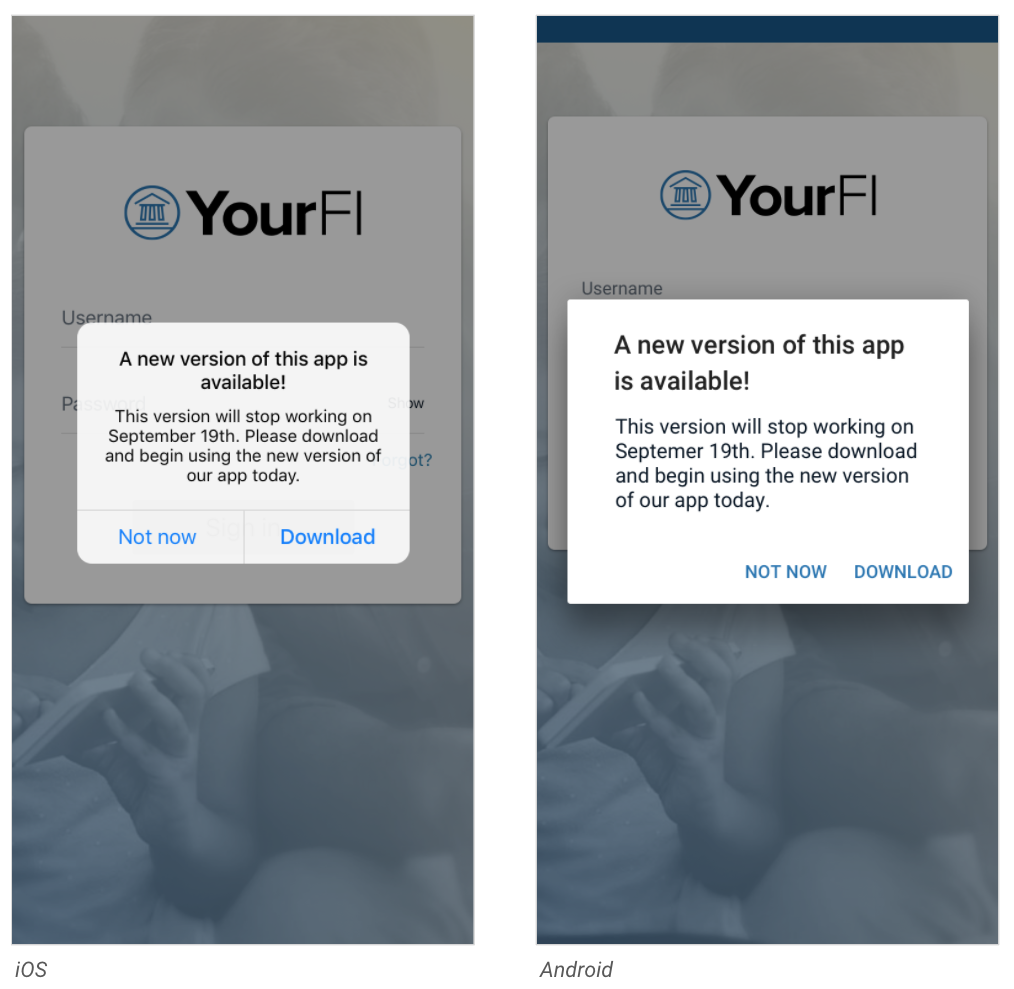
If you choose to guide your end users with a soft prompt, the prompt allows them to log in to the app. Upon login, end users can choose to immediately download the new app or wait. If they wait to download the new app, the soft prompt will display on every single successful sync when the end user logs in. Our goal is to consistently remind the end user to download the new app and begin using it.
Here’s a template to get you started:
- Headline (1)
- A new version of this app is available! The headline is non-customizable.
- Message body (2)
- This version will stop working on [insert date]. Please download and begin using the new version of our app today. The message body is customizable.
- Not now
- The Not now button dismisses the prompt. For Android end users, they can also click anywhere outside of the prompt to dismiss it. This button is non-customizable.
- Download
- The Download button links to the new app in the App Store or Google Play Store where the end user can then download the new app. This button is non-customizable.
Hard prompt
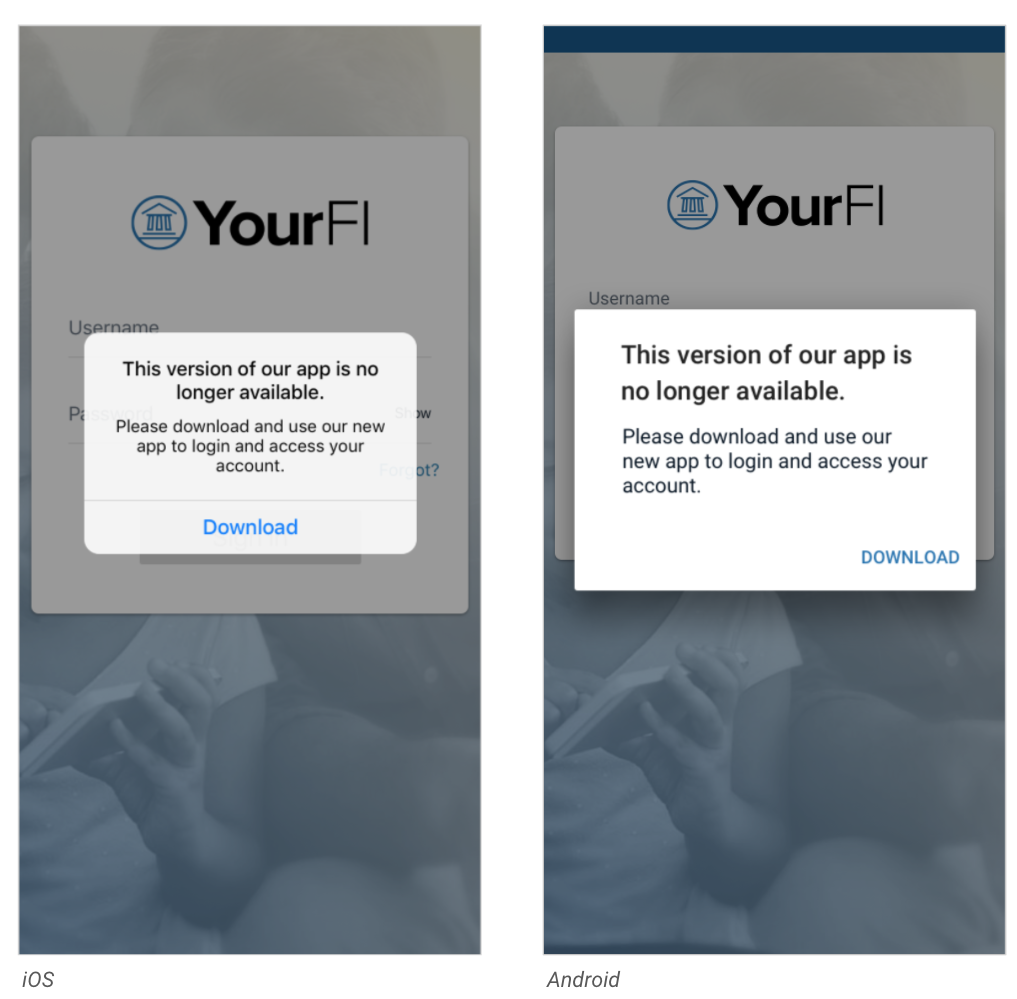
If you choose to guide your end users with a hard prompt, this prompt blocks them from logging into the app and directs them to download the new app.
Here’s a template to get you started:
- Headline (1)
- This version of our app is no longer available. The headline is non-customizable.
- Message body (2)
- Please download and use our new app to login and access your account. The message body is customizable.
- Download
- The Download button links to the new app in the App Store or Google Play Store where the end user can then download the new app. The button text is non-customizable.
Migration FAQ
- How does Banno migration differ from goDough?
- Our migration differs from goDough in that we display static text instead of a countdown timer that updates the end user on how many days until the app discontinues.
In addition to our written documents outlining the steps for setting up keys and accounts for mobile stores, our operations team creates videos outlining the process in detail. See what’s available below.
Android store setup
FAQ
- How do we update our Age Ratings responses for the iOS app?
- To ensure uninterrupted future app deployments, log in to your Apple Developer account (by January 31, 2026) and complete these steps for all digital apps in your account:
- Select the appropriate app.
- Near the upper-left corner, click the blue + button.
- In the new version popup that appears, increment the last integer in your current version by 1 and click Create.
Note: After completing step 3, the app will be in “Prepare for Submission” status. - Navigate to App Information and complete the Age Ratings section.
Note: If the Edit button is not available, the steps above have not been completed correctly.
Should you need assistance answering the age rating questions during this process, we recommend engaging your appropriate internal teams.
- How often are new app versions deployed?
- New app versions deploy once each month, but there’s no deployment in January.
- How are institutions informed of app deployments?
- Prior to uploading new app versions to the iOS and Android app stores, we publish release notes on ForClients.
- Do institutions have the opportunity to test apps prior to deployment?
- No, we automatically publish new app versions to live institutions.
