Quick Reference Guide: ACH File Data Transmission via sFTP
Overview
The ACH File Data Transmission via sFTP feature of the Treasury Management platform meets the needs of higher volume ACH originators and can improve integration with a business payment process. This solution will provide the bank customer with the ability to send NACHA formatted ACH files to Treasury Management via SFTP (Secure File Transfer Protocol). The capabilities include utilizing the existing NACHA file format, intuitive file upload workflow and reports.
Benefits
Benefits for Banks
- Additional key ACH payment capability, especially for high volume businesses.
- Back Office Report providing visibility into the ACH File activity.
- Ability to charge via Enhanced Account Analysis through a billing counter.
Benefits for Customers
- Eliminates the need to input individual ACHs batches/files when volume is a concern.
- Enabling end user to process, delete, view, and review the file.
- Enabling workflow allows users to review and confirm ACH file contents.
- ACH File Activity reporting to easily track ACH file activity.
- Additional fraud risk point controls.
Back Office - Company User Configuration
![]()
- Company User Configuration – ACH Entitlements
Create ACH Payment can be enabled within the Company Users Configuration. This configuration will be utilized for manually uploaded files and files sent via sFTP.
Back Office - Notification Configuration
![]()
- Notifications
ACH File Transmitted notification will alert a user when an ACH file has been successfully transmitted to Treasury Management and available on the ACH File Activity page for processing.
Sample - Notification
![]()
Back Office - ACH File Upload Report
![]()
Back Office report that provides information about the files uploaded or transmitted vis sFTP.
- Search
Report Results will be based on the search criteria that is used.
- Report Results
- Process Date
- Processed By
- Received Date
- File Name
- File Size
- Source – If file is transmitted, Source will be = System. – If file is manually uploaded, Source will be = company user who uploaded the file.
- Total Batch – The total number of ACH batches include in the file uploaded or transmitted.
- Approved
- Pending Approval
- Rejected
- Expired
- Total Debits
- Total Credits
- View
Select View to display the list of ACH batches included in the file. The list of ACH batches will open in a modal. From within the modal, users can view file details. When View File Data button is selected, the modal will switch to a view of the file as it was transmitted.
Navigation
![]()
From the main navigation, users can:
- View ACH File Activity.
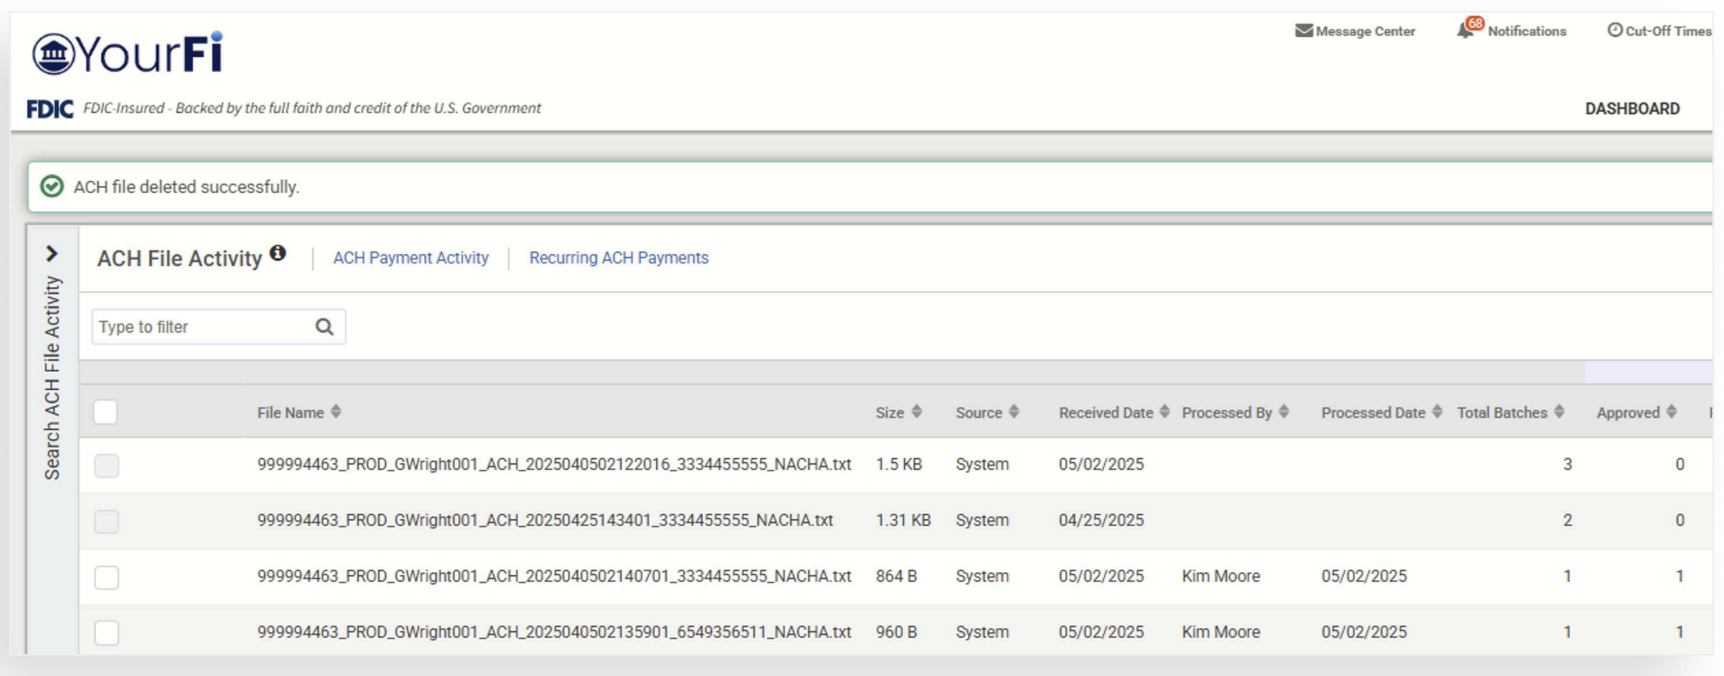
ACH File Activity
![]()
ACH File Activity view will display a list of ACH files that have been uploaded or transmitted via sFTP.
- Quick Navigation
Users can quickly navigate between page views (ACH File Activity, Recurring ACHs, and ACH Payment Activity).
- Type to Filter
Users may utilize the Type to Filter in order to narrow the results. This feature will filter across the results to refine based on the users entered criteria.
- Information Available
- File Name
- File Size
- Source (User or System) – If file is transmitted, Source will be = System. – If file is manually uploaded, Source will be = company user who uploaded the file.
- Received Date
- Processed By
- Process Date
- Total Batches (in the file)
- The status of the ACHs including – Approved (or submitted) – Pending Approval – Rejected – Expired
- Total Debits
- Total Credits
- Actions
- ACH Actions
For an ACH file transmitted via SFTP, users will have the ability to Process, View, or Delete the file. Once a file is processed, the Review File action will be available and will take the user to the ACH Payment Activity page. From the ACH Payment Activity page they can select the Transaction ID to see the list of ACHs recipients that were created from the processed file.
![]()
Once the transmitted file has been successfully processed, the actions to Process and Delete will no longer be available. The action to Review and View file will be the only available actions. If the file is not processed by a company user before the next cutoff, the file contents will expire and cannot be processed.
ACH files transmitted via SFTP will use the Source of System.
Received Date will be the date the file is transmitted via SFTP or manually uploaded by a company user. Processed By and Processed Date will be the date a company user either manually uploads a file or takes the action to process a transmitted ACH file.
ACH Activity - File Hyperlink
![]()
- File Name
Users can access the ACH Payment Activity page for a specific ACH File by selecting the Review ACH action on the ACH File Activity page. This action will direct the users to the ACH Payment Activity page, displaying only the ACH batches for that file. Selecting the ACH Batch Transaction ID will show the batch details, including the file name under the status. The file name will be a hyperlink, which, when clicked, will return users to the ACH File Activity page, showing details for the selected file only.
![]()
- Process ACH File
When the action to Process a file is taken, the user will be presented with a confirmation message asking if they are sure they want to process this transmitted ACH file. The message will include the ACH file name and a button to Process File or Cancel.
- Process File – selecting this button will take user into the Process file workflow and the user will land on the Create ACH Payment/File Upload Summary page.
- Cancel – will return the user to the ACH File Activity page with no action taken on the file.
Process ACH File Workflow - Summary
![]()
- File Summary
After a file has been selected for processing, users can view the Payment Details if a single batch or the File Summary information if multi batch. Payment Details will give the batch information and display the recipients. If multi batch, summary will include the file name, summary information (File Size, Total ACH Balanced/Unbalances Batches with total debits/credits) and a list of ACH batches included in the file.
- ACH Details (Multi Batch)
Multi batch payments details can be viewed by selecting Details, which will display the recipient details for the selected batch. A user can edit some batch information within the Summary portion of this work flow (if they have entitlement File Upload Edit).
Fields that can be edited for multi batch:
- Batch Name
- Effective Date Fields that can be edited for single batch:
- Effective Date
- Frequency
- ACH Selection (Multi Batch)
A user can choose to exclude a batch from being submitted for processing by un-checking it during review. If the bank later wants to process said batch, they will need to retransmit or manually upload the batch.
Process ACH File Workflow – Review
![]()
Users can review the batches or recipients a final time before submitting and must update the Offset account number if an offset is needed and hasn’t been defined.
- Offset Account
If an offset is required, an input box will be available to select the account to be used for the offset payment.
- Back
Select the back button to navigate to the Summary page and elect the details link to make any changes to the payment information.
- Confirm
Select the confirm button to create the ACH transactions and send them to core.
- Cancel
Selecting the Cancel button will present a modal asking user if they are sure with buttons to Continue Editing or Ok.
- Continue Editing – will close modal and user can continue.
- Ok – will close the Process ACH workflow.
Process ACH File Workflow – File Process Confirmation
![]()
When a file is successfully processed and ACH transactions are created, the user will be given a success message. This message will be different based on the file composition.
- File Summary
After a file has been successfully processed, users can view a summary of file information. For a multi batch file, it will include the file name, summary information (File Size, Total ACH Balanced/Unbalanced Batches, Total Debits/Credits) and (Beneficiaries, and Total Debit Amount). For a single batch file, it will include the batch details, including the recipient details.
- Download
Download will allow the user to download the file in CSV, NACHA, or PDF format.
Selection of the Print icon will open the print dialog and print the details of each ACH transaction created and processed in a single batch file or in a multi batch file, it will include the batch details.
ACH File Activity Workflow – Delete File
![]()
- Delete ACH File
When the action to Delete a file is taken, the user will be presented with a confirmation message asking if they are sure they want to delete this transmitted ACH file. The message will include the ACH file name with Delete File and Cancel buttons.
- Delete File – selecting this button will delete the ACH file from the ACH File Activity page. No further action will be allowed on this file.
- Cancel – will return the user to the ACH File Activity page with no action taken on the file.
- Delete ACH File confirmation
When an ACH file is successfully deleted, the user will be returned to the ACH File Activity page with a Delete successful message.
ACH File Activity Workflow – View File
![]()
- View ACH File
When the action to View a file is taken, a modal will be opened allowing the user to view the contents of the file, exactly as they were transmitted. The file name and file type will be located at the top left of the modal. A scroll bar on the right will allow the user to move up and down to view the file contents if they exceed what can be displayed initially.
- OK - Using the OK button will close the modal.
ACH Payment Activity
![]()
The ACH Payment Activity page will list all ACH batches that have been manually uploaded or transmitted files processed.
- Quick Navigation
Quickly navigate between page views. Will allow users to go quickly between ACH File Activity, Recurring ACHs, and ACH Activity page views.
- ACH Detail
To view the detail for an ACH batch, select the Transaction ID.
Note: The ACH Detail page will include the File Name for the uploaded ACH.
- Action Menu
If a payment is Pending Approval, selecting Cancel will cancel the batch and it will no longer be available for approval. If a batch has been Initiated, selecting Uninitiate will uninitiate the batch.
- Action Buttons
Users can select one, multiple, or all ACHs to approve or reject.
- View File Icon
Selection of this icon will take the user to the ACH File Activity page where the details specific to the file containing this payment will be displayed.
ACH Activity - ACH Details
![]()
Selection of the ACH Batch Transaction ID allows the user to view the specific details about the batch, including a hyperlink to the ACH File the batch is associated with.
- File Name
To view the details of the ACH file, select the file name. The user will be taken to the ACH File Activity page with the details specific to the file containing this transaction.